Showing posts with label depth of field. Show all posts
Showing posts with label depth of field. Show all posts
Sunday, November 15, 2009
Photographing Infants: Part 2
And now, the moment you've all been waiting for, photos of my son!

In this photo Alexander is three days old and like a good baby model, sound asleep. I wanted to achieve the look of natural light with soft shadows and a slight directional quality as if the light was screaming in the window. Then I remembered I live in Western Washington and light here can be hard to find on a rainy day. I found myself with two choices, either shoot with the natural light and a high ISO or try flash. Before anyone skips to the bottom of the page and begins commenting on how mean it is to startle infants with a strobe, let me tell you how you can do the same without causing any trouble for yourself and your subject. The name of the game here is bounce.

To start I placed a pop-up reflector card by my front window and then positioned the SB-900 on it's floor stand (included in the box) about half a foot away from the reflector and pointing directly at it. I also positioned another reflector by Alex's head and 180 degrees from the flash and reflector combo in the window. To test the flash I placed a stand in for Alex in the basket and checked the lighting was what I wanted. Then while holding my son I tested the flash at half power and watched him to make sure he wouldn't jump in my arms. When it flashed Alex didn't even move a muscle because it was several feet from him and being redirected by the reflector cards. Completely ready I took off his clothes, fed him, and then once he was fast asleep, placed him in he basket. For me getting babies into the right position is always the hardest part. Key things to remember though: make them look comfortable, (unless you're going for that Anne Geddes I'm a super bendable infant thing) try to find angles that flatter them just as you would adults, and work fast once your shot is set up. With a naked infant there are a number of things that can go horribly wrong in a matter of seconds. I'm sure you can guess what those are so I won't elaborate.

The shots used in this blog post were all shot at the same exposure 1/20 @ f4.5. I wanted the background visible but not distracting. And as usual I enjoy shooting with wider angle lenses close up. The first image above was shot at 16mm so I could include the entire basket and some of the floor. The next image (left) was at 35mm and still has some of the wide angle feel but it's closer to normal (50mm) so there is just a little distortion. (Or in layman's terms- the reason why this baby looks to have a giant head.) Plus with the f4.5 you can see that the image is sharp from his hair to fingers. Note: it's always good to remember that the depth of field provides sharpness forwards and backwards from your focal point. So because I was focused on Alex's eyes, his hands and hair also fell within that range while letting the background and the rest of his body past the shoulder fall off in sharpness and blur together.

The next image has the same exposure, nearly the same focal length (40mm), but the angle is different. I moved about a foot to the right to become more parallel with the baby and by doing so I changed ever so slightly the focal range and perspective. The third image (right) shows his head in better proportion to his body and while I like the angle of the second image I think it's important to note how different they look and how minor the adjustments between each image create varied results.
In case your wondering set up for these photos took about a half an hour and I shot nearly 20 frames during the next 10 minutes. At that point Alex was tired of me pushing his legs back into the right place in between shots and began to fuss. Being his mom and knowing we were going to do another photo shoot the following day, we ended our photo session. If the baby had been a client's child we would have moved on to another pose after the baby had some time to settle down. On average this can be a few minutes to a half an hour in some cases.
The Alexander photos continue tomorrow with some tutorials about how to make better black and white images.
For more information about infant portrait session with Irene Jones Photography please visit our website, Irene Jones Photography Online.


To start I placed a pop-up reflector card by my front window and then positioned the SB-900 on it's floor stand (included in the box) about half a foot away from the reflector and pointing directly at it. I also positioned another reflector by Alex's head and 180 degrees from the flash and reflector combo in the window. To test the flash I placed a stand in for Alex in the basket and checked the lighting was what I wanted. Then while holding my son I tested the flash at half power and watched him to make sure he wouldn't jump in my arms. When it flashed Alex didn't even move a muscle because it was several feet from him and being redirected by the reflector cards. Completely ready I took off his clothes, fed him, and then once he was fast asleep, placed him in he basket. For me getting babies into the right position is always the hardest part. Key things to remember though: make them look comfortable, (unless you're going for that Anne Geddes I'm a super bendable infant thing) try to find angles that flatter them just as you would adults, and work fast once your shot is set up. With a naked infant there are a number of things that can go horribly wrong in a matter of seconds. I'm sure you can guess what those are so I won't elaborate.


In case your wondering set up for these photos took about a half an hour and I shot nearly 20 frames during the next 10 minutes. At that point Alex was tired of me pushing his legs back into the right place in between shots and began to fuss. Being his mom and knowing we were going to do another photo shoot the following day, we ended our photo session. If the baby had been a client's child we would have moved on to another pose after the baby had some time to settle down. On average this can be a few minutes to a half an hour in some cases.
The Alexander photos continue tomorrow with some tutorials about how to make better black and white images.
For more information about infant portrait session with Irene Jones Photography please visit our website, Irene Jones Photography Online.


Saturday, November 14, 2009
How to Photograph Infants

Alex weighed eight pounds and measured 20 inches long when he was born. The day of the birth no photos were take because as a rule my husband and I have decided that when it comes to personal family moments no cameras are allowed. We have done this because we hate experiencing birthday parties, Christmas and other important times with a camera in hand. We want to be a part of the action and not always the one documenting it. So with video camera put away and my Nikon D-300 at home, we spent Saturday evening with our new little boy and the quiet joy that new life brings.
 All of the images in this post were done at the hospital. I brought with me some new blue blankets from home and we wrapped him in them and covered the cushion in his bed with one also. My photo equipment had to be simple since it was a hospital and not a photo studio after all. So natural light and a pop up reflector to the rescue! My hospital room had a very large window on the north face (score!) so where to shoot was a no brainer. The best spot for the reflectorw as directly opposite the window so as much light as possible would be bounced back on the shadow side thus bring up the exposure and minimizing the contrast. The lighting you see in the photo has a 2:1 ratio. What is a lighting ratio you ask? Simply put it's the difference in the exposure across the scene (or most commonly the person's face). On the left of Alex's face you see the highlight from the window This exposure is about 1 stop brighter then the right side of his face. The ratio is just a technical short hand for explaining the difference. There are also some advantages of photographing newborns under these conditions in addition to easy set up and beautifully diffused light..
- Newborns are mainly photographed asleep simply because that's what they do best. Natural light is even and steady so it won't disrupt the slumber of a tired baby. Flash on the other hand will make your baby tense up, all of their reflexes fire simultaneously and they might even start to cry: ending your photo session. There are ways to use flash (I'll talk about this tomorrow) but pointing directly at your subject or even close to them is out of the question.
- Controlling contrast is also an issue. Mentally our perception of babies conjures up images of fluffy blankets, pastel colors, and all things adorable. In photography this translates to a need for soft shadows, slightly directional lighting (since texture is important to show detail) and a low level of contrast. Highlight and shadow detail are important so watch your exposures carefully!
- Finally depth of field is a major factor in infant portraiture. The dreamy quality that shallow depth of field evokes helps to sustain our notions about all things cuddly in relationship to babies as well as draw the viewer eye to the face of our new sleeping baby. The blankets become blurs of color (used only to suggest gender and warmth) and enhance instead of distract from the focal point: his sleepy eyes.

For this next photo instead of focusing on his face I chose the hospital bracelet. For me the slight change in focal point also changes the image from a standard portrait into an editorial piece and often it is that simple difference that can make or break an image. I would love your opinion, so please comment and come back tomorrow for a gallery of naked baby photos!
Irene Jones Photography offers studio and location portrait sessions for infants, children and families. Please visit Irene Jones Photography Online to view our portfolio and session pricing.
Part 2 of Photographing Infants tomorrow.
Saturday, November 7, 2009
Finding Balance: Flash in Daylight

This image is a fantastic example of how using a flash to fill can make what otherwise might have been a boring image into something beautiful.
During this shoot Brittany (the Bride) asked, "Can we do a photo where I'm smelling a flower?" Terice's eyes met mine and we both smiled apprehensively and said "Sure." This is a request we get occasionally. I don't know where it comes from, but I've never liked it before, it's a little...cliche'. Then something happened. Terice took charge and placed the bride near a patch of flowers in the garden that looked similar in form to the ones she was already wearing in her hair. It was a overcast day but at that moment the sky opened up and sunlight fell along her left side. Ordinarily this by itself would make for a great image, especially since when light hits the back of flower petals they glow! The view of the bride was best on the shadow side of her. From the sun side the background was less interesting and very distracting. Positioning her speed-light on a light stand about 8 feet away from Brittany and 6 feet high on a light stand, Terice created a great highlight on the shadow side of the bride and the effect of three dimensionality you see here. It's subtle, (like the highlight on her arms) but pretty. Additionally an umbrella was used to modify the quality of light from the flash and reduce harsh shadows.
What I like most about this photograph is how well the two light sources are balanced. Finding the correct exposure for both the sun and flash is easier then you might think. Here's how to do it:
- Meter the light from the sun either with your cameras internal meter, a hand held light meter, or guess if you are old school and still remember the sunny 16 rule. Try to get an overall exposure. One good trick is to make sure your camera is metering for the whole scene if you plan to go the internal metering method. On our Nikon D-300's this mode is called Matrix Metering. The camera metered the scene at 1/200 @F14.
- Then meter for the flash. This is something that a hand held light meter is best for if you are just starting out. Or you can guess based on distance and experience. I mentioned that the light Terice was using was about 8 feet away from the bride. At full power each foot of distance is equal roughly to about 1/2 F-stop with my Nikon Speed-lights. There is a good chance that this same ratio won't work for all flash equipment but with time you can figure out what does work for you. By placing the light farther back from the subject you can quickly control the output without having to change any flash settings. Remember speed is often your very best friend at weddings. 8 feet of distance between the bride and speed-light equals 4 stops.
- Using manual mode, choose the shutter speed from your overall exposure (1/200 for our example) and the F-stop from your flash (F14 minus 4 stops gives us F 4.8). Terice's on-camera flash was set to commander mode to remotely fire the flash, but not actually illuminate the bride.
- Be prepared to make adjustments. Check your histogram, (I don't trust view screens) and then you can manipulate the power level more exactly by adjusting the power output or moving the flash closer or farther away as you see fit to achieve the depth of field you want. All in all this will save you actual shooting time and provide better exposures overall.

(Note: If I was ever to get a tattoo it would say: The law of reflection states that θi = θr, or in other words, the angle of incidence equals the angle of reflection. This is basic stuff that we all should know from high school. My point? A good photographer may do this instinctively but a great photographer does it cognitively.)
The reflector would have softened the shadows but not from the same angle or with the same control. Here's a sorry excuse for a diagram to show what I mean. As the diagram crudely shows, the light would have been from a different angle if bounced by a reflector. Before the comments come in about how my angles are wrong in the digram, I know, I just can't draw for my life.
There you have it, good lighting changes what otherwise is boring and uninteresting into a better image, Thanks again to Terice for letting me blog about her and her work.
The Series continues tomorrow with more on using flash in daylight.
Today's featured image is from a wedding shot this summer for Brittany and Ryan. If you would like to see more of their images visit my Facebook page for Irene Jones Photography and view their album.
Friday, November 6, 2009
Fill Flash Basics: Simple things you can do to make a better portrait.
 What do you do when it's 45 degrees outside, starting to rain, and late in the afternoon in October? Well in my case you end up shooting a family portrait. I am based in Seattle you know so many of the days here fit this description. The family shown to the left had been planning this shoot for quite some time and until we actually started shooting it had been dry. Undaunted, and knowing I had to work quickly, I grabbed a single speed-light and we all went for a walk in the woods admits the autumn leaves. The lighting lacked direction and depth, but that was okay since the main focus of any family portrait is good illumination across the faces of all subjects, so in this case I went with it. The best part was that with no harsh light or shadows to be found we could shoot anywhere in the park uninhibited. It was a cold day, so I'm glad my clients thought a head and planned matching coats. Another blessing from the low light was the shallow depth of field. This image was shot on a monopod at an exposure of 1/60 @ f 5.6. The lens was a 28-80mm zoom to 80mm. The combination of the wider aperture and ever so slight telephoto lens adds great separation from the background and turned the trees behind into a soft blur of color.
Now this shot could have easily been done without the fill flash but a few things would have happened. I would have lost about a whole stop of light, maybe even two. This would increase the possibility of blurry people from camera shake or just good old fashion movement on anyone's part. (People breathe and the simple act of doing so can make them blurry at low shutter speeds.) It also would have meant less detail and color in the background. A washed out background would have been detrimental to this image since the color of the leaves mirrors their warm skin tones and the Mom's hair.
Using fill flash did the following things:
- Added light to the faces of the subject to balance the exposure against the background.
- Removed shadows that often come when the subject has deep set eyes (the Dad) or the side of the nose (the Mom).
- Added catch lights to all of the subject's eyes.
- Acted as a warming filter in the cool cloudy light and enhanced the color in the skin tone/background.
- Increased the exposure and created a stop-action image that was sharp and pleasing.
- Added detail to the shadows (their coats) so the contrast level included both shadow and highlight detail and looks more natural.
Second, when using a speed-light so close to your camera you will get shadows, harsh ones too if you don't find a way to diffuse them. My strategy was shooting though a small soft-box attached to the speed-light. This made the shadows that would have appeared under their chins and eyebrows soft. Additionally by shooting this image horizontally (landscape) any shadows that the speed-light created "fell off" behind them since they were several feet from the trees shown in the background. The same shot framed vertically (portrait) runs the risk of shadows along the entire length of the subjects when using on camera flash. That would have been detracting. To combat this there are wonderful device known as a flash bracket. It allows you keep the flash in relatively the same position above the camera but turn your camera and avoid the weird shadows that looks so unnatural.
Overall, it's a very simple shot-executed simply, and here's my point: better photography comes from knowing when to rely on the basics and when to apply a more advanced technique. There is no silver bullet for every image, that's why it's an art form. For this photo, the weather dictated the need for speed and accuracy. As much as I would have loved to use a more complicated lighting set up, keeping my clients in the rain for longer then necessary was not an option.
To review follow these simple steps:
- Add fill flash to images to balance an exposure and create greater interest.
- When using an accessory flash resist the urge to attach it to your camera's hot-shoe. Instead use a flash bracket or light-stand (I'll talk about this more tomorrow) to move the light up and away from your lens. This will reduce unnatural shadows.
- Use anything (and I mean that literally) that will modify and diffuse your light so harsh shadows bite the big one.
- Choose the setting for your flash that is appropriate for the situation. This means knowing ALL of the features of your equipment. So stop using the owner's manual as a coaster and read it.
- Try not to over complicate things and always consider your situation when choosing what equipment you plan to use.
Tomorrow we'll go to the next level and discuss how taking your flash off the camera changes everything. In the mean time please post your comments and links to images you've done with simple flash techniques. It's great to see what others are producing.
Sunday, November 1, 2009
What you don't know about your camera can hurt you.
As much as I would love to summarize the entire History of Photography course I took in college in one blog, I want to talk mainly about why knowing a thing or two about optics can change the way you photograph.
Since the advent of the view screen, many point and shoot cameras (thanks to the habits of their consumers) have dropped the viewfinder all together. Even the Nikon D-300 I shoot with has the option of using Live View and skipping the viewfinder all together. This is just one example of how photography continues to adapt to the needs of the user. The SLR (single lens reflex) came from a similar revision that allowed the photographer to see exactly (or at least a more accurate view) of what would be captured on the film plain. Today film has given way to digital sensors and a whole host of people owning digital SLR's. Sadly though, many have fallen prey to the fallacy that by owning a camera with more megapixels, you will instantly take better photos.
As with all technology, operator error is the main reason for poor results. So for all of you that have said to me "I really like photography, I wish I knew more about it." Here you go. Free, uncensored advice from a pro on how to subtly improve the images you create. So let's start right now with something simple.
Depth of Field
Since Wikipedia already exists, you'll need to use the link above for a scientific perspective and exact definition of Depth of Field (DOF). Let's talk about the application of this technique. (And some other more advanced stuff just for fun).

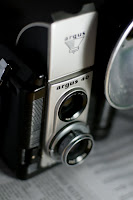
The image you see here is of an twin lens Argus 40. Use the link to learn more about the camera, it's history and see images of a mint condition one (mine is beat up somethin' terrible) and images made by this great little camera. I thought this would be appropriate subject matter since it's one of the precursors to the SLR. The image was shot "wide open." The exposure is 1/320s @ f2.2 . The lens is a 50mm (Standard) which can actually go as wide as F1.4 but I wanted to make sure I got the entire brand name in focus. My light source was a compact florescent bulb about 5 inches to the right of the subject and a folded piece of white paper for a fill card on the left. The newspaper is shown below the Argus 40; it just felt right to show two antiquated but completely functioning objects together.
Can you see the isolation that shallow DOF brings? Nothing is in sharp focus outside the words Argus 40, and even there sharpness begins to fall off at the 40 ever so slightly. The newspaper is illegible (which wouldn't be the case if I was shooting at an equivalent exposure like 1/2 sec. @ F 16. At a smaller aperture DOF increases forwards and backwards from the point in which the camera is focused. Depending on your intent, DOF is one of the most important tools in photography. It helps to create a point of interest, is key as a design element, and since it is tied directly to the basic operation of all cameras, crucial for the photographer to know how to use properly. The simple act of knowing what F-stops produce greater and less DOF will revolutionize any beginning photographer. You should be the one deciding your camera's exposure, not the camera. So many of the evolutions in photography (internal metering, auto focus, zoom lenses) are wonderful tools for the skilled user, but they have become handy-caps for the novice. Photography is a science AND art. You cannot do one properly if you neglect the other in this medium.
Okay, enough ranting... anyone want to know how to about how to mimic the blue hue in the above image? I use Adobe Lightroom 2.0 to edit my images. As a wedding and portrait photographer I deal in volume and Lightroom has been a saving grace. This year alone I have processed over 64,000 images in record time thanks to this well designed software.
Here is the original image. After importing it into Lightroom I adjusted the settings under the develop tab to these amounts:
Color Temperature: 2100 Kelvin
Tint or Hue: +18 (towards the magenta end of the spectrum)
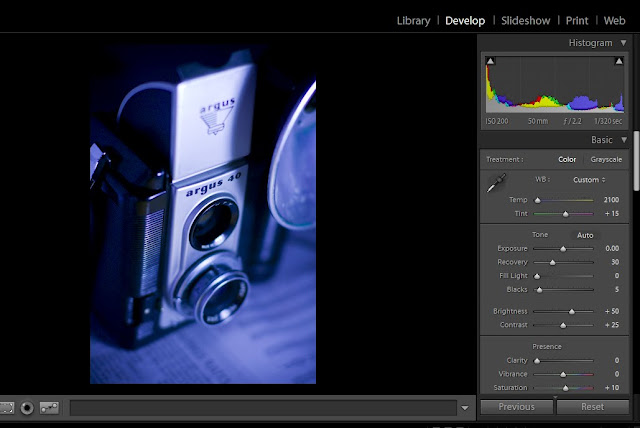
That's all it takes to fake the look to a tungsten balanced film shot in daylight. You see, the color of light is based on it's Kelvin temperature. Daylight is about 5500K and with the advent of color film came the need for multiple types of film to match the variety of light sources besides the sun. These include your regular 60 watt tungsten indoor lights, your florescent tubes and everything in between. I'm sure it didn't take long after these films hit the shelves that someone shot them outside and found a profound color shift. It's a fun trick and nice throw back to another era of photographic evolution.
If you plan to do the same thing in Adobe Photoshop here's what you need to do:

1. Create a Hue/Saturation layer
2. Use the drop down menu and select Cyanotype (yet another by gone style of yester-year)
3. Increase the saturation to the desired level. I chose 47.
Nostalgia and software aside, photography in all in the application. Tomorrow blog will focus on anther rudimentary element of photography; composition. Until then, please browse the portfolios at Irene Jones Photography Online for examples of how I've used depth of field in my wedding and portrait work.
Since the advent of the view screen, many point and shoot cameras (thanks to the habits of their consumers) have dropped the viewfinder all together. Even the Nikon D-300 I shoot with has the option of using Live View and skipping the viewfinder all together. This is just one example of how photography continues to adapt to the needs of the user. The SLR (single lens reflex) came from a similar revision that allowed the photographer to see exactly (or at least a more accurate view) of what would be captured on the film plain. Today film has given way to digital sensors and a whole host of people owning digital SLR's. Sadly though, many have fallen prey to the fallacy that by owning a camera with more megapixels, you will instantly take better photos.
As with all technology, operator error is the main reason for poor results. So for all of you that have said to me "I really like photography, I wish I knew more about it." Here you go. Free, uncensored advice from a pro on how to subtly improve the images you create. So let's start right now with something simple.
Depth of Field
Since Wikipedia already exists, you'll need to use the link above for a scientific perspective and exact definition of Depth of Field (DOF). Let's talk about the application of this technique. (And some other more advanced stuff just for fun).

Can you see the isolation that shallow DOF brings? Nothing is in sharp focus outside the words Argus 40, and even there sharpness begins to fall off at the 40 ever so slightly. The newspaper is illegible (which wouldn't be the case if I was shooting at an equivalent exposure like 1/2 sec. @ F 16. At a smaller aperture DOF increases forwards and backwards from the point in which the camera is focused. Depending on your intent, DOF is one of the most important tools in photography. It helps to create a point of interest, is key as a design element, and since it is tied directly to the basic operation of all cameras, crucial for the photographer to know how to use properly. The simple act of knowing what F-stops produce greater and less DOF will revolutionize any beginning photographer. You should be the one deciding your camera's exposure, not the camera. So many of the evolutions in photography (internal metering, auto focus, zoom lenses) are wonderful tools for the skilled user, but they have become handy-caps for the novice. Photography is a science AND art. You cannot do one properly if you neglect the other in this medium.


Okay, enough ranting... anyone want to know how to about how to mimic the blue hue in the above image? I use Adobe Lightroom 2.0 to edit my images. As a wedding and portrait photographer I deal in volume and Lightroom has been a saving grace. This year alone I have processed over 64,000 images in record time thanks to this well designed software.
Here is the original image. After importing it into Lightroom I adjusted the settings under the develop tab to these amounts:
Color Temperature: 2100 Kelvin
Tint or Hue: +18 (towards the magenta end of the spectrum)

That's all it takes to fake the look to a tungsten balanced film shot in daylight. You see, the color of light is based on it's Kelvin temperature. Daylight is about 5500K and with the advent of color film came the need for multiple types of film to match the variety of light sources besides the sun. These include your regular 60 watt tungsten indoor lights, your florescent tubes and everything in between. I'm sure it didn't take long after these films hit the shelves that someone shot them outside and found a profound color shift. It's a fun trick and nice throw back to another era of photographic evolution.
If you plan to do the same thing in Adobe Photoshop here's what you need to do:

1. Create a Hue/Saturation layer
2. Use the drop down menu and select Cyanotype (yet another by gone style of yester-year)
3. Increase the saturation to the desired level. I chose 47.
Nostalgia and software aside, photography in all in the application. Tomorrow blog will focus on anther rudimentary element of photography; composition. Until then, please browse the portfolios at Irene Jones Photography Online for examples of how I've used depth of field in my wedding and portrait work.
Subscribe to:
Posts (Atom)