Wednesday, April 14, 2010
Perfecting the Classic Pinup
 When I first opened my studio Terice quickly grabbed some good friends, a bunch of vintage clothing, and promptly began photographing 40's style pinups. Her shots are closer to glamor shots then boudoir pinups (which I'm grateful for- not interested in seeing women objectified). I must say that her first solo attempt in the studio turned out some nice images. She used hard spectral lighting sources which matches the lighting style of the era and her posing and composition has a modern sensibility without detracting from the intent. She showed me the photos, I showed her how to avoid some of the pitfalls next time (mainly how to light the while background evenly) and we both moved on. Time passed and I totally forgot about the session until this morning when I started digging through my archives from last year looking for a photo to use on this blog. Here's what I found.
It's pretty cute, but this blog is about showing how to make something better, so I decided to give the image a tune up.
To get from the unedited version to the classic look of my edit is just a few simple steps.
- Use the Liquefy filter to create an unrealistic figure. Pinups were not originally photographs. They were drawings for one reason; normal women don't look like Pinups! These days every photo is doctored. No joke. Everyone wants to look better then they really do and the good people at Adobe have made that possible. If you've never used this tool before it's simple. Use the bloat tool to increase bust size and the forward warp tool to slim and reshape curves. (I just vomited in my mouth a little while thinking about the unattainable standards women are held to.)

- Then I cleaned up the background with the dodge tool. The image is high key so to ensure that I didn't dodge out her skin and hat I used the magic lasso set to 15 tolerance. This preserved the areas I wanted to keep while allowing me to dodge out sections quickly.
- Once the background was a clean white I dodged out the shadow to make it softer. One thing was still off, she needed to look freakishly tall and leggy. So I used the marquee to select her legs and then used free transform to stretch them out.

- The final step was adjusting the color. Using levels to brighten her face while masking out her legs gives her a more consistent lighting pattern. I wanted a saturated, warm skin tone, as if the image had been shot with Tungsten lights on a daylight balance. I also wanted to add a little bit of that "old drawing" feel. So it was natural to apply one of photoshop's standard filters "water paper" on a duplicate layer. Fiber length was set to 1, brightness 60, and contrast 80. Once the filter applied, I set to the mode to soft light at 78%.

Tuesday, April 6, 2010
Come for the Coffee, Stay for the Overcast Skies
Seattle is my home, always will be (if I can help it). I love it here. Coffee shops out number natives two to one. Everyone dresses like they are ready to go hiking at all times. And it rains, more then I care to admit. Yes, when you live in a place where everyone is suffering from seasonal depression, your false god of choice is the sun.
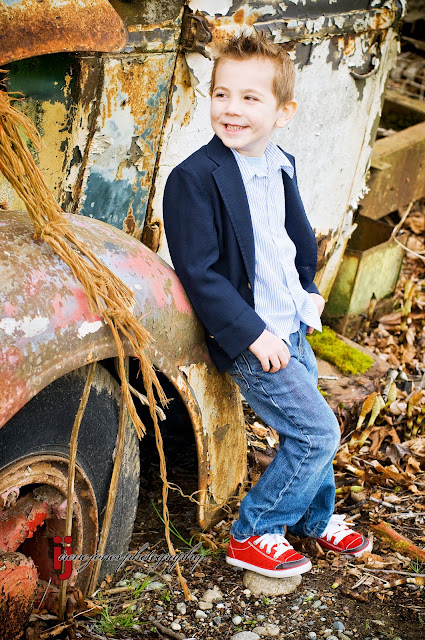
To this point, today I photographed my son Tyler minutes before the rain began to fall. In any other place common wisdom would suggest that today wasn't the right day to trespass into a secluded car graveyard with preschooler and camera in hand. (Some of you are thinking- it's NEVER a good idea to trespass. You are correct; but I lean towards getting the shot and then asking forgiveness later.) The reason I was so willing to risk rain and hillbilly gun fire was the light. Perfect, seductive, overcast light.
The combination of high clouds bloated with moisture and the noon day sun makes a celestial soft box that will softy kiss the cheek of any subject and provide delicious saturated colors. Minimal work, I just have to be there. Joe McNally's blog (which I highly recommend) spoke of this back in Feb. As a photographer we wait on the light, we are subject to it's every whim, and love every moment.
Tyler on the other hand was not so enthusiastic. The clouds and approaching storm meant cool temperatures and wind that he said "hurts my eyes." I bribed him heavily and he smiled about three times.
The real magic of this photo I think is the shoes. The red pop is really nice and the color on the car is classic. I did however enhance it slightly. This is an easy trick though. Create a layer in photoshop and set it to color mode with about 20-30% opacity. Then chose a deep rich color and paint on your layer. The color will be applied to the image. I made several different color layers with different tonalities and opacities to achive the desired look. The rope was also traffic cone orange in the original image. I toned it down by adding a slight green on one of my color layers. Finally I increased the saturation and contrast slightly, watching carefully to avoid loosing information in the highlights and done! The 24x36 gallery wrap print is already set to be ordered and placed above my fireplace (with the images of his sister and brother of course) in just a few weeks.
Tuesday, March 30, 2010
Here a blog, there a blog, everywhere a blog, blog....
I will be guest blogging this week at http://www.mcpactions.com/blog/ so be on the look out. I'll be addressing the trouble some people have properly exposing when the subject is wearing white. After writing a rough draft I decided I needed some specific photos for this post. Then I remembered its time to update my facebook and twitter profile, and I have a super cute white shirt. So one thing led to the other and it became a portrait session for Terice and I. Mind you I take photos of Terice all the time, (she's my muse/assistant).
Additionally if you are following this blog and haven't checked out my studio's blog now is a great time! Until April 10 you can buy a gift certificate for a future session and 100% of the proceeds will go to support the American Red Cross. This is an extension of the Helping Haiti Through Photography Event we held on March 27th. And if you are tried of hearing about the event know that I WILL NOT stop talking about it until enough money has been raised to meet the goal I set for donations. So donate now even if its for no other reason then to make me shut my big trap.
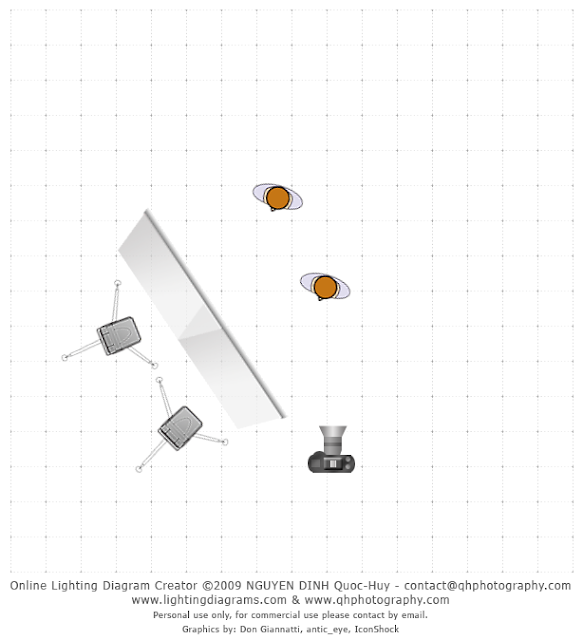
Speaking of our charity event, here's some favorites. All of these shots used the same lighting pattern, as shown in the diagram below. I love the soft diffused quality of light, don't you?


 .All shots are at 200 ISO with 1/200 shutter speed and f4-f8 aperture depending on the subject.
Additionally if you are following this blog and haven't checked out my studio's blog now is a great time! Until April 10 you can buy a gift certificate for a future session and 100% of the proceeds will go to support the American Red Cross. This is an extension of the Helping Haiti Through Photography Event we held on March 27th. And if you are tried of hearing about the event know that I WILL NOT stop talking about it until enough money has been raised to meet the goal I set for donations. So donate now even if its for no other reason then to make me shut my big trap.
Speaking of our charity event, here's some favorites. All of these shots used the same lighting pattern, as shown in the diagram below. I love the soft diffused quality of light, don't you?


Thursday, March 25, 2010
Fruits of the Spirit : Zion Lutheran Pre-K
 My son's Pre-Kindergarten class is contributing the following print to their schools auction. Each child held a fruit representing the fruits of the spirit: faith, love, charity, etc. The image will be printed on canvas and each child will sign their name along the edge.
Creating this image was simple. We dressed each child in a black coat to create the backdrop.One SB-900 on a stand was positioned above and a little behind the child's sholder so the light would fall on the fruit. I used a scrim (translucent material) to soften the shadows. Exposure was 1/125 @ f4 ISO 400.
I then burned the background to a solid black in photoshop before selectively coloring the fruit.
To create the selective color technique is simple. I created a hue and saturation layer and masked out the fruit. Then using the colorize feature I added 32 hue and 15 saturation to give the skin a slight sepia tone. I hope it sells for a ton of cash to support Zion Lutheran!
Monday, March 15, 2010
Pugmire Family Portrait

I posted some time back that I was working on a composite of a large family in photoshop. In total I photographed 35 members of one extended family. Some were shot as individuals while others were put into groups. Each photo was done on a white background with the following lighting set up. Shots were taken over a series of days to accommodate the schedules of the different families.

- I set the background lights at full power with key light -1 stop from full power.
- Exposure is F9 @ 1/250 a second. This had to stay the same for all shots.
- Camera has 16-85 mm lens ( I should have used the 50mm to avoid distortion- something I simply forgot to do!) Most of the shots were done at 40mm and a few were at 24mm. This was a huge mistake that cost me a lot of time in post production. (Don't you hate it when you make a dumb mistake like that!) I shot each person individually and in groups so I could have a reference point as to their height and proportion to one another. It was also very important to get shadows on the ground in the photos so no one looked like they were floating in space.
- I took over 200 shots (about 10 images per grouping/individual) in different poses. Some on the ground, others standing, then sitting, so I had a wide range of options. I knew the basic outline of what I wanted as a final product and I used the diagrams I drew out prior to shooting to guide how I posed everyone.
- Once I had shot all the images it was photoshop time. Each photo had to have the background masked out but the shadows on the floor needed to stay. The white background helped out a lot.
- Once the images were all within the same file I placed each photo where I thought it looked best and then adjusted the masks I had already made to fit.
- The last step was to dodge and burn in shadows that matched the studio lighting. If I skipped this step the people would have looked like cardboard cut outs where their body parts overlapped.
Tuesday, February 23, 2010
When an architect marries a lawyer...
Congratulations to Megan Sheets and Steven McKay married Feb. 20, 2010. Here is one of my favorite photos of them from their portrait sessions.
 We photographed their portraits at the Sculpture Gardens downtown Seattle. It was an amazingly beautiful day for February. Thanks El Nino! While the Eastcoast drowns in snow, I'm watching my flowers in my front yard bloom and laughing in spite of myself.
Because it was so bright it was important to use the shade side of the red sculptures to subtract the overpowering sunlight and keep the subjects comfortable. No one likes to look directly in the sun!
The next step was to suspend a translucent medium in front of two sb-800 flash units to create a large soft light source.
The exposure was then balance between the flash and daylight to keep the city blue sky visible in the background.
The shapes of the art as well as the shadows they created add a lot to the image.
More of Megan and Steven's photos will be online in two weeks at Irene Jones Photography Online.
Please search for Megan and Steven and use password 21366 to log in.

Tuesday, February 16, 2010
Supporting the Hatian Releif Effort: Portrait Event!

I'm a news junkie. I guess I learned that from my Dad. Growing up I watched Dan Rather and pretended I was a correspondent stationed in remote parts of the world reporting on all sorts of world events. Even though I was very young when it happened, I still remember vividly watching footage of the Tiananmen Square Protest on 1989. I couldn't help but feel helpless just watching these events unfold on TV. I wanted to be able to do something but at eight years old my circle of influence was slightly diminished.
It's been over a month now since the Earthquake leveled most of Haiti. It pains me that while these people are still suffering greatly, and conditions continue to deteriorate, that one of the greatest disasters in my lifetime has nearly fallen out of the news cycle. Our lives go on and our attention spans seem only to last as long as a commercial break.
I'm not eight years old anymore and I cannot help but feel a strong obligation to give all that I can to help those in need. I am now in a position where I can make a difference and dispel that terrible feeling of helplessness that I remember from my youth. I encourage all of you donate to the organizations on the ground in Haiti such as the red cross, salvation army and other charities with a track record of good works.
Donating is a great thing, but I also wanted to do more. And short of leaving my young family to go to Haiti myself, I've decided to use the resources available to me here at home to increase the good I can do.
Saturday March 27th my studio will holding a portrait event. 100% of all proceeds from this event will be donated to the Red Cross.
Doors will be open between 9am and 6pm on the 27th. Both walk in and scheduled appointments available. Each portrait session will be up to 15 minutes in length and free of charge. Children of all ages, families, and pets are encouraged to attend! Please call and schedule a session for any pets please. Once your session is completed you may choose one of the following print packages for your favorite image.

-2 5x7 prints
-4 wallets
$25.00
Package 2:
-1 8x10 print
- 2 5x7 prints
-12 wallets
$50.00
Package 3:
-1 8x10 prints
-4 5x7 prints
-5 4x6 prints
$85.00
Package 4:
- 16x20 print
- 25 4x8 photographic cards
$125.00
Package 5:
- 11x14 print
-2 8x10 prints
-10 4x6 prints
-25 4x8 photographic cards
$ 175.00
Add On Prices:
2 Wallets - $5.00
1 4x6 - $5.00
1 5x7 - $10.00
1 8x10 - $25.00
1 11x14 - $50.00
1 16x20 - $100.00
25 4x8 photographic cards - $20.00
If you would like to purchase additional prints from your session all photos will be posted at our website Irene Jones Photography Online with in 1 week. Any additional print sales will also be donated to the Red Cross.
All packages will be available for pick up at our studio on April 3rd, Just in time for Easter! Cash and Check donations preferred but credit card donations also accepted. For more information or to book your session time please call 425.367.4781.
Our studio is located at 2110 Broadway, Everett WA 98201. Click here for directions.

If you are unable to attend I encourage you to please visit the Red Cross Website today and donate directly today. View the Red Cross's report on what they are doing in Haiti now.
Tuesday, February 9, 2010
How to choose a professional photographer

I will be the first one to say there is room in my industry for all kinds. I don't take it personal when someone isn't in love with my work. My self worth isn't based on the opinions of others so I'm pretty hard to annoy.
Truth is: my biggest pet peeve is ignorance and since the collision of digital photography and the 10% unemployment rate, stupidity has become contagious! There are so many photographers now that consumers are now being hunted like injured gazelle on the Serengeti. Informed customers are the best kind. They get what they want at fair market value. The problem isn't too many photographers, it's not enough buyers have taken the time to understand what they are getting. Thus a large number of photographers creating sub par images are providing work at bargain basement prices. It's the Walmart business model applied to a skilled art and it spells trouble.
So consumers listen up! Here's the things you should look for when choosing a photographer.

1. Don't ask what equipment they have. It doesn't matter. What matters is how they use it. I own a toothbrush and whitening strips but that doesn't make me a dentist. The years of experience, a quality portfolio that shows my results, and an education in the use of all kinds of lighting, subject matters, and business practices is what makes me a professional.
2. Do ask to talk to past customers. The referral should provide you with information about the photographers personal demeanor, skill set, and customer service style (or lack their of). Photography is a art but portraiture is a business, so make sure you photographer knows how to act like a professional as well as shoot like one.
3. Visit their studio or have an in home consultation before the shoot. If you are not comfortable with chatting with your photographer then, how easy will it be to work with them? Not every photographer is right for every person. Shop around until you find one that understands you and your family.
4.Visit their website and compare portfolios first. The fatal mistake many people make is they go directly to the pricing page and never even click farther then that. Price is an important factor but it isn't the right way to select the person who will capture timeless memories for you. Think in terms of quality to help you establish value. Then if you have something different in mind then the specific packages offered on a website, ask about custom packages. I am in no way suggesting you haggle for a better deal. Just inquire about all of your options.
5. Do not ask a photographer to copy an image you saw on someone else's website. Not only is this copyright infringement, but it's in bad taste. You should hire a photographer for their skill and creativity. If you really love an image and want something similar for your own portrait, go to the photographer who created it in the first place! You'll be happier with the quality long term.

Tuesday, February 2, 2010
Notes
Originally when I started this blog I wanted to post an image a day, Over the last three months I've done my best to keep up with the daily grind but I'm finding it harder and harder to live at a break-neck pace. Alex is three months old this week and demanding non stop feedings. Business is growing (always a mixed blessing) and my pregnancy weight is shrinking thanks to many hours spent in front of our Wii. Something's gotta give.
So I'm going to reinvent my blog to a weekly installment. I hope you won't be too disappointed! Additionally I'm going to focus on post quality and not quantity, so hopefully it will be an improvement.
But if for some reason you live any die for my daily posts may I suggest you fill your time in with visiting my friend Heidi's blog! She just opened her own photography business (though I still think she should come work for me). Please check it out!
Monday, February 1, 2010
Multiple Flashes With a Little Physics on the Side

The camera was placed on a tripod and the aperture set to the maximum for my lens so I could get the most depth of field. The shutter was set to 30 seconds. Then came the hard part. Courtney and I had to work in the complete dark. My job was to fire the strobe with the test button from different angles while keeping it out of the frame so I didn't' show up in the image and she had to navigate around the room in the dark. The 30 second exposure felt like for ever.

It took several tries to get the result but here's the final product. No photoshop necessary. This is all done within one frame. This technique can work for still or moving objects as long as the flash is your only light source, it must be completely dark.
In college we did this same technique to get greater depth of field in the studio for product shots. For example, say I was shooting a photo of a large product, like an SUV in studio (never-mind the logistics of getting it in the studio) If I didn't have enough power to get the maximum aperture with one flash, I could increase the number of flashes to increase the exposure.
Now you could do this as a guess and check but there is also an easy equation that will save you time.
E=l/d is the mathematical representation of the way light works according to the inverse square law. (The link has a good explanation of this.) In simple terms this expresses the relationship between the distance (d) from the light source and the required intensity (l) for correct exposure (e).

To increase depth of field by adding additional flashes we solve for "l" to know the correct number of times the flash most go off for proper exposure at our chosen aperture. The law says that an object 2x the distance from a light source will receive a 1/4 of the illumination. By moving your subject from 4 feet away to 8 feet away, you will need four times the amount of light for the same exposure.
For example: If Courtney is four feet away from the speedlight at full power and I want to shoot at F22 but my current meter reading is saying I have enough power for F8 I'll need to use the flash four times in the same shot to get the correct exposure and make up the two stop difference.
What you may not realize is that this law is in action no matter the light source you're using. Have you ever thought to yourself, "oh my subject just moved farther away from me, I need to open up to a larger aperture?" Then you've just used the inverse square law without even thinking about it. Pretty cool yes?
Saturday, January 30, 2010
Chris and Murisia's Wedding
I don't often go into the details of my customers personal life, but I wanted to share the story of Cris and Murisia. They are such amazing people who are very close to my heart. I met Cris several years ago when he painted our home's interior. He did such a good job that we hired him again to paint our kitchen cabinets and then this last year he painted our home's exterior. During those years they experienced all the challenges that life can offer. Job loss, law suits, family illness, and many more. All along the way they stuck together. This last year was especially difficult as they tried to plan their wedding admits all of these problems.
Here are a few photos from their wedding.


Here are a few photos from their wedding.


The ceremony was small and very sweet. A few family and friends gathered to witness their marriage. What impressed me most was the feeling of thankfulness that seemed to emanate from the couple. Despite not knowing what was in store for them in the coming months, if they would find work, or where they would end up living, they were glad to be together and that's all that mattered.
I am happy to say that this story has a happy ending. Cris found a job, just a few days ago.
To Cris and Murisia; may God bless you with the strength to continue on, the love that only a family can give, and happy memories from this day forward!
Thursday, January 28, 2010
Website Update complete!
Caleb pulled a few all nighters but it's done! Our website's update for 2010 is complete. New packages, portfolios, and a more interactive layout have been added. I'd love to know what you think. And please, let me know if find typos or have any issues with navigation. Your comments will help us improve our client's experience. Thanks for checking it out!
Wednesday, January 27, 2010
Profile Photos

Why? We live in a new age where copyright laws are, well, let's just say, being reinvented everyday. I firmly stand on the side of other creative types and feel that intilectual property holds a value for which one should be compensated. But I think it crazy to fight against the proliferation of ideas and content for the sake of controlling it. I simply believe that yet again a social revolution has created an opportunity. Offer digital rights and receive approperate compensation, or let someone steal it from you and go completely unpunished. I prefer to keep my clients on the right side of the law. (Mom this means you!)
Plus with this feature I've found greater appeal. Just ask any client who has recently had a sneak peek of their wedding photos thanks to facebook or today's model, Patsy, who when hearing digital rights were included in the session booked instantly.
For me this is no brainer. More exposure, free word of mouth advertising, and instant feedback from clients and their friends. I know what images my clients like, what they are staying about them and I have created an opportunity to keep in touch with them and increase return patronage. All for doing something besides playing Farmville.
This same feature has also been invaluable when working with High School Seniors. I don't know how many times I've added a new client simply because a current client shared their images on facebook.
Tomorrow: More on Filters and White Balance.
Tuesday, January 26, 2010
Website update nearly complete
I had anticipated my websites overhaul to be completed yesterday but no such luck. Hopefully today will be the day. Just a few details left, cross browser compliance, final spelling check, etc. When I realized the website wouldn't be up yesterday and that would mean nothing to blog about, I tried my hand at an HDR landscape of the view from my back yard. Funny thing is, I didn't realized how ugly our view is until I saw the photos! All the trees are dead, the black berry vines are dried and withering, and the retention pond is filled with random things (some garbage) that the neighbor kids have thrown in over the fence. I didn't see all of this because I have photo tunnel vision. This is a condition I often get when shooting. I see some detail I like (for example the nice sunset) and miss all the ugly in front of it.
So I scrapped the HDR and I'm thinking about what kind of landscape I can work on. I want to get better at this genre but I don't quite know where to start. Any suggestions?
Here are some blogs I found about landscape photography.
http://digital-photography-school.com/11-surefire-tips-for-improving-your-landscape-photography
http://www.photographytips.com/page.cfm/77
http://photography.nationalgeographic.com/photography/photo-tips/landscape-photography-tips/
Saturday, January 23, 2010
Night Portraits

I've talked a lot lately about indoor lighting and I felt a little claustrophobic so into the chilly air we went. During the hour we were shooting we met a whole host of street life in downtown Everett and tried hard to make James smile to no avail.
This shot is straight forward enough. Two speedlights, one for each guy and a slow shutter speed. Because the flash freezes the action I didn't have to worry about them being sharp. I just had to put my camera on a tripod and wait for a car to pass behind them. At one point a bus drove by and the blur was great, only problem was both guys blinked.
This is a decent shot, not exactly what I had in mind but it will do for tonight. I had a client meeting and we were running out of time, so Terice and I will have to try again next week. I do like having the guys at opposite sides of the frame though.
Here's the set up.

Exposure was 1/8 @F4.5. ISO 200 with 50mm lens.
Christina and Corbin's Wedding
Congratulations to Christina and Corbin, my first wedding of 2010! Married Jan. 9, 2010 at Lord Hill Farms. It was a beautiful day for Jan. (who knew that could happen in Western Washington?) and I loved working with these two. They are easy going, fun people, so the whole day was a breeze. If you are interested in seeing all of their images the entire collection will be posted on my website next week. Follow the link below and enter password 21366 when prompted.


Thursday, January 21, 2010
Using Indoor lighting for Creative Portraits

Exposure: 1/100 @ f 2.2 IS0 400
Just for fun I took two photos and combined them in photoshop. Here are the two images I used.


The left is shot with a 50mm and the bokah shot is 300 mm.
Wednesday, January 20, 2010
Ambient Light Part 1


Even with 2 lights I could only get 2.5. Some of that has to do with the empty garage I used as a background though. Adding a reflective white background and my exposure increases a half stop. I chose to keep the same aperture and increase the shutter speed instead.


If you're looking produce more photos with a commercial edge this is a very inexpensive way to start. Any local hardware store will have both the bulbs and light housings. A set of four lights will cost you $40.00 at Home Depot.
Tomorrow, lighting the world 40 watts at a time.
Tuesday, January 19, 2010
Lighting Indoors Part 3


Here are some window light photos. The first is from 10am the second is at 4pm. It was an usually nice day yesterday, so when the light came in the living room in the morning I had more light to work with. By the early afternoon when the sun was going down my results are different. (Plus the second photo is not so flattering as the first of me. I guess that's what I get for doing self portraits with a timer.) Both shots with a 50mm lens but the ISO has been raised for the second image to make it work. This is also a good opportunity to talk about noise. Here are some crops of the same photos at 100%. These are unedited. To help reduce the noise I used the Dfine 2.0 plug in on the last crop.


This image has had the noise reduced slightly but it's still not as nice as the ISO 200 shot. This is why I try to avoid higher ISO's unless it's totally necessary. It simply saves time while post processing. I have gotten nice results with ISO's up to 1600 but it took some extra work. I'd rather be on the couch watching a movie personally...
A couple things to remember when shooting with window light.
- You will almost always need a reflector to fill in the shadow portion of a person's face. Contrast can be problematic in shots like these. I was holding a reflector just off camera left in the first shot. I didn't need one for the evening shot since the light was very flat!
- Watch for color shift. At different times of day you'll find the color of the light will vary. The color is the second shot hasn't been edited- it's right out of camera. I look slightly blue green, not so pretty as the warm glow of the direct sun light in the first shot.
- I recommend using a tripod for any shots like this. You will most likely be shooting at wide open apertures with higher ISO's, and even then need a longer exposure to gather the light necessary. The morning light shot was 1/40 @ F8. I don't recommend hand holding 1/40 with a 50mm. I get camera shake every time. The evening shot was even slower. Even with the ISO at 800 I still could only manage a 1/20 @ F2.8 exposure. Big difference.
- It also might help to use a spot metering mode (where available) to expose for your highlights only instead of metering the whole scene. Focus of capturing the subject only- let the other details and background go. If those elements are vital to your image, you'll need to rethink your lighting. I spot metered the morning image and you can see that the background goes darker behind me. The evening photo has more detail in the background because of the longer exposure.
Subscribe to:
Posts (Atom)