Thursday, December 31, 2009
Ages and Stages to Photograph Infants
Sadly enough my son is now old enough that I can't do a lot of the great poses I like to do with brand new babies. The plus? He's smiling at me all the time now and is actually awake once and a while. He'll be two months old in January and he's rapidly approaching those great developmental milestones that are fun to photograph. I personally think that all infants need professional pictures capturing each phase of their first year and recommend to customers to have portraits at 1 week, 3 months, 6 months, 9 months and 1 year. Yearly portraits are also important after that. Here's why:

I can't forget, today's image is of Greyson, he was born in early December and is a very fun baby to shoot. Like most babies, he took his time falling asleep but once he did, it was easy to move him around however I wished. For the first shot I took the photo from directly above. The exposure is 1/100 @ F6.3 ISO 200. The key light was my normal background light and the fill is opposite the key with an umbrella for diffusion. Greyson was on an ottoman and I was standing on a chair looking down.
For tomorrow: more of Greyson and discussion on focal length, and quality of light.

- At one week infants still have the "newborn" look, and the ability to sleep through anything. I have great images of babies up to 1 month old in the same style, but overall it's best to capture them before they put on a bunch of weight and/or have a case of baby acne. My son is already up to 13.5 pounds and he was only 8lbs.when he as born. Babies are literally different from day to day.
- At three months most babies can hold their heads up well while on their stomachs. They also will smiles those great big baby grins we all love. Additionally they are awake more, but still sleep a good portion of the day so it's possible to get both awake and asleep images in one session.
- Six months is when most babies start sitting up well unaided. These are so cute! Some also crawl and/or roll over. I try to catch these new skills in the session. Oh, they can also reach their toes! Makes for some cute stuff.
- Once nine months rolls around many kids are staring to stand up, pull up on things, or even walk for some kids (much to the dismay of their parents!). These make for great full body shots.
- And of course 1 year. You can't forget that first birthday. Clients of mine that do all 5 sessions I've listed above all receive a free baby album including 20 8x10 photos as a gift.
I can't forget, today's image is of Greyson, he was born in early December and is a very fun baby to shoot. Like most babies, he took his time falling asleep but once he did, it was easy to move him around however I wished. For the first shot I took the photo from directly above. The exposure is 1/100 @ F6.3 ISO 200. The key light was my normal background light and the fill is opposite the key with an umbrella for diffusion. Greyson was on an ottoman and I was standing on a chair looking down.

For tomorrow: more of Greyson and discussion on focal length, and quality of light.
Online Proofing from Collages.net


What I really want to talk about today is Online Proofing. Since digital became the standard for photography, physical proofs (often 4x6 or 5x5 prints) have become a thing of the past. Instead photographers are choosing to provide an online shopping and proofing experience. Benefits of this system are:
- Convenience for photographer and customer alike. No unnecessary appointments to order prints, return proofs, or pick up pictures.
- Faster turn around times. Most sessions are posted between 24-72 hours after the images are taken.
- Customers can share photos with friends and family around the world which means increased sales!
Visit the Irene Jones Photography Online Client Login Page.
Choose Cecil and Paul's session and enter password 21366 when prompted. Some features you'll like:
- View a full screen slide show of all the images.
- Change images to black and white and back to color with one button.
- Compare images side by side and zoom in.
- Share images with friends by posting to facebook, email, or the guest book.
- Create a favorites folder for easy ordering.
- Order prints and photographic cards in a matter of minutes!
To any photographers reading; there are many different providers that offer online hosting, but I chose Collages.net because of the print quality they produce, their fantastic customer service (I have had a few issues that they have corrected without extra charge or shipping fees. Very friendly and fast too!) and they provide great marketing tools that help to increase sales on each session. I have seen my print sales quadruple (litterally) since I swiched from my pervious online hosting site to Collages.net.
Fees are minimal and payments are sent regularly which has made taxes each quarter easier too!
Besides my extreme satisfaction with Collages.net I have a hidden agenda for this blog post. I want to earn some credit for referring other photographers. If you're interested in signing up let me know and I'll send you an email with a $25.00 credit attached. There is no initial set up fee and everything is pay as you go so all different budgets can afford this service. Check it out, I'd love to hear your comments!
Tuesday, December 29, 2009
Assistant Photographer(s) Training Manual
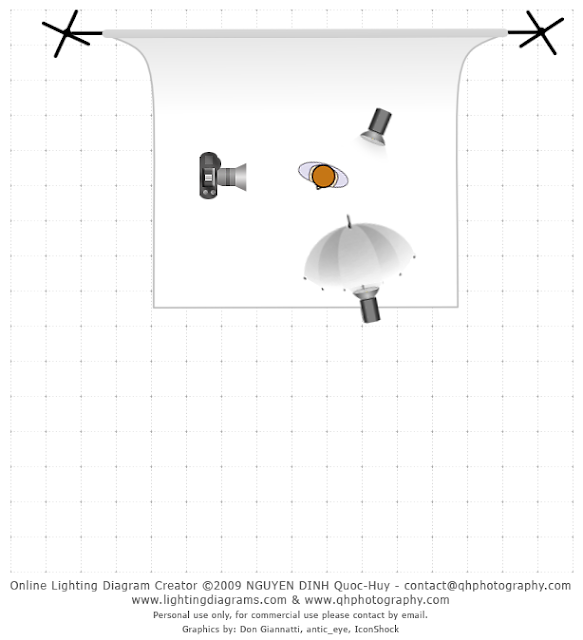
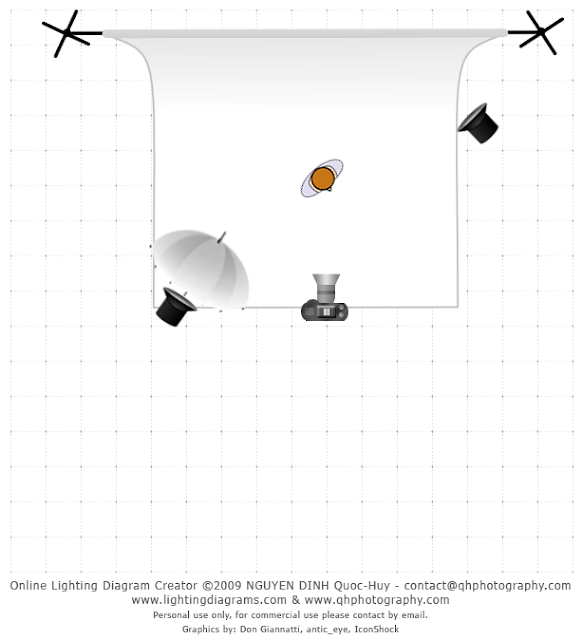
My new goal is creating a training manual for all current and future assistant photographers to use when they start working in the studio. I want to create a variety of images on all of our backgrounds to show posing, lighting patterns, and inspire creativity. So I sent out a call for anyone that wants to model for me on Twitter and Facebook and my neighbors across the street were ready to help. From the session today we did a few different backgrounds but my favorite photo is this one.

Set up was simple. Main light on camera left, and background light from camera right. The thing I like about it is the profile position and obscured eyes give it a little bit of mystery.
Here's another one from today.
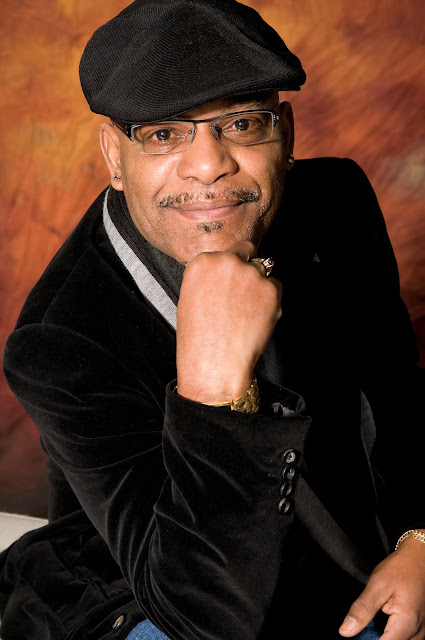
 The second image has the key light in the same position and a very low powered background light that is not directly pointed on the background. I've found that this particular canvas looks best when it's not directly lit. The colors can be overwhelming at times but it worked nicely with his skin tone. Oh and did I mention I love hats? Always a great way to add character and interest to a photo. Both images are shot at 1/200 @f 8. That aperture in my mind in perfect for adult portraits. There is enough depth of field to handle a few people in one shot, but not so much that the background show every wrinkle. If I was to do anything different it would be on the second shot. I would add a small fill card directly below the subject on camera right. The black jacket has no detail, which is okay, but I would have liked a little more information in the shadows.
Monday, December 28, 2009
Terice's Training Sessions

Our subject is 3 month old Emmit. Isn't he darling? The image is very simple to do really. The baby is laying on his stomach being propped up by a Boppy pillow covered in a white fuzzy blanket. The background is the same blanket. I'm holding the blanket up behind him. The single light source provides a pretty broad lighting pattern while keeping some shadows for dimension and that all important catch light in his eyes.
As I mentioned yesterday, we used a remote to release the shutter and tripod so as to focus on getting the little guy to smile. His mother was also a great help in getting his attention. The pose is one of my favorite parts. Three month old babies are normally very good at holding their heads up in this position, but keep in mind they tire easy! Another good position for babies this age is on their side. Prop up the baby on the back and side so he's "lounging". Also keep the parent close at all times ready to jump in if the baby begins to slide or needs any help. The last thing any photographer needs is an injured child! I always keep my infant subjects as close to the ground as possible since the idea of a baby falling off a posing table scares me to death.
For this shot Terice was laying on her stomach to be at the baby's level and the tripod was extended to it's smallest height of 24 inches. Having the right equipment, and a little flexibility can really pay off!
Exposure: 1/200 @ f11 ISO 200
Sunday, December 27, 2009
Fun times for my 5 year old

One of the hardest parts about photographing people is simply the barrier between you and your subject that the camera creates. Here are a few simple tricks that have worked for me to help disarm and even find a personal connection with clients (weird I know).
- Talk to your subject! Before I even start a session I take time to meet with my clients, discuss what they like, dislike and learn a little about them. I even let the conversation digress into random small talk since the whole point is to learn more about them. Then when we start shooting, I continue talking! A gift of gab can be very useful. Another key tool is listening. Search what the client is telling you for details that will give hints about that person's personality that you can then reflect in their images.
- Walk your client through the photographic process. Chances are that if you work with the general public they aren't in front of the camera every day and won't know what to expect or how to act. Explain what you are looking to achieve and complement them when you like what you see.
- Provide motivation. If you want a particular emotion, help the client feel the sentiment you desire. If you want a true smile make the client laugh with a self deprecating joke, silly prop, etc. A laughing smile means the corners of the eyes will also turn up, erasing any faked smile. I've been known to anything for a laugh. Having a good joke on hand is always helpful, or an assistant that will dance on command! Terice over the last 4 years has been the butt of many jokes that have helped to produce many great images. Thanks for taking one for the team Terice!
- Ask for input. Over the years a number of my favorite shot ideas have come from clients. Remember you aren't the only creative person alive!
- Step out from behind the camera. If you have a client that can converse with you easily but becomes stiff when you look through the viewfinder, then back away. Put the camera on a tripod and grab a remote shutter release and strike up a conversation. This works great for kids. I start playing with them and then hit the shutter release when the smile appears. Plus it adds the element of surprise since the subject doesn't know when the photo will be taken.
- Keep in mind that some times luck is always a factor in photography. Keep your reflexes sharp and chances are the fortunes may smile on you.
Friday, December 25, 2009
A Christmas Story
 My kids are easy going, so getting a reaction from them can be hard to do, especially when they are sleepy.
 Though just a few minutes later, Audrey is ready to pose for the camera and Tyler digs right in!


Grandma and Grandpa Jones gave Tyler and Audrey some very soft blankets. As you can see, Tyler is very happy.


All in all we had a great Christmas. I hope yours was also a wonderful time. Thanks for reading!
Thursday, December 24, 2009
Merry Christmas!

Wednesday, December 23, 2009
Family Portrait Composit

The main reason for doing the photos this way is two fold:
- Everyone looks better. When shooting groups of two or three it's easier to concentrate on making everyone look great. The more people added in each frame the harder it gets.
- By putting the images together into one giant file I can print this sucker really really REALLY big without up sizing and distorting anything.
To make my giant family portrair happen I've scheduled sessions with everyone involved, taken careful notes about focal length, exposure, and positioning for all lighting and subjects. This makes it possible to match the lighting on each group and then when everything is put together it will be believable as one shot. I also have diagrams of what I want the final shot to look like. So far I've only shot 4 families of the 9 that are married and I have over 250 images and about 40-60 frames for each family. Some of the images are them looking at the camera, others are more lifestyle where they are interacting with one another, and still others are a combo of both sitting and standing poses. I also photographed each person individually, just in case.
I should be done with the project in early Feb. so stay tuned!
Tuesday, December 22, 2009
Mulligan
Today I shot three family portraits, spent four hours too many at the mall with three kids, one of which is trying to get over a cold and when he cough sounds like he belongs in an iron lung. Then I took the oldest two shopping separately so they could buy presents for each other, all while running on 5 hours of sleep since my baby doesn't like to go to bed until 1 am. I also tried to squeeze in a shoot of some Christmas lights but when I got to the home that I planned to photograph the owner wasn't around to turn on his fantastic display and again I missed my opportunity. So this will come as no surprise, something had to give. I have not one intelligent thought left in my head so no photo for today. I think I'm going to go address my Christmas cards instead.
Monday, December 21, 2009
Natural Light Vs. Flash
When I'm shooting an event the challenge is trying to use a multitude of different techniques to create a body of work that is cohesive yet varied in style. The images need to represent my point of view while telling a personal story and highlighting the specified needs of the client.

 For example: These two images are shot in the same location and just seconds after each other but both images convey a different mood. The first is a image shot using only the available light from the window so the bride is silhouetted. Some detail can be seen in her dress and around her but that's all. The act of the bride looking out this window insinuates a feeling of anticipation. By shooting the image using only the window light the geometry of the glass panes become more obvious and the black and white also helps to make the lines of the image and the light cascading in the focal point. By shooting at 1/160 @F6.3 the room goes dark. This is because the fast shutter speed is exposing for the natural light and not the incandescent lights in the room. A slower shutter speed would have picked up the overhead lights and the contrast wouldn't have been so lovely. The next image is shot a few seconds after the first but the style has changed completely. Fill flash has been added to bring up the light in the room and the image is shown in color instead of black and white. Additionally, the exposure has changed dramatically. The color photo was shot at 1/60 @f9. Notice how the flash becomes the main light and it's directional from camera left. While detail is still visible outside, the light from the window is now acting as a secondary light source. Also, the shutter speed was reduced so the window looks brighter even though the light levels haven't changed, more light has simply entered the camera's lens the second shot so it is more exposed then the first. There are a few things that you can see in the color version that were obscured in the black in white. The reflection of the second flash can be seen in the widow, the radiator behind the bride,the extension cord and outlet at her feet and the color of the (ugly) rug in the room. All of these problems can be removed by re-framing the image and coming in for a tighter crop, but if your client has asked for a full body shot (and who wouldn't if she looked this good?) The best choice is the black and white image.
 And this goes back to my original point, knowing a variety of techniques and being able to handle light in all sorts of ways makes you a better photographer. I've head it said many times by other professionals "I'm a natural light photographer." Which for me translates into, "I'm afraid to try new things." My advice, never let yourself get stuck in a rut. When faced with a photo opportunity, don't be scared to ask yourself, "how can I do this differently?" and try a fresh approach. The worst that can happen is you'll fail! Failure is simply an opportunity to learn. So if you're going to mess up, do it with gusto and a lot of carefully taken notes so next time you'll be one step closer to creating an image that is unlike anything you've shot before.
Sunday, December 20, 2009
Tips that will Help any Mom Shoot like a Pro.
This is a re-post from my business blog done in October 2009. I have two sick kids tonight and I thought this article worth another look. Enjoy!
Yesterday a friend of mine and I photographed her daughter in my studio. My friend is an amateur photographer, but a quick study. Hanging out with her and sharing some tips on how to use her fancy new camera gave me the idea of posting a few tips for every Mom or Dad who wants to take better photos of their kids at home.
1. Loo k for great light: Forget your on camera flash.
Either take your kids outside and use the best light source in the universe (you know, the Sun?) or during the day use the lovely soft light of a window, skylight, or open door. Keep in mind that photographs are a 2 dimensional representation of a 3 dimensional object. Using the on camera flash creates flat, straight forward lighting that will make your kids look lifeless and many times, overexposed. If you are using a SLR camera you can adjust your ISO to increase the camera's sensitivity to the light. Keep in mind this also increases noise. Many point and shoots also allow you to increase your ISO or they automatically adjust to lower light. Most of all keep in mind that photography is all about light and that it might not be a good idea to always shoot in low light conditions if you want good images. In the image to the left you can see a slight shadow on the left side of Hannah's face. Here the light source was from my right side, about 45 degrees from me and the camera. This subtle shift in the direction of the light makes her look natural. The flat lighting of an on camera flash would have also created harsh shadows under her chin and along one side of her body; not attractive. Good images have a great balance of light and shadow. In summary; they mimic the way our eyes are used to seeing things in real world.
2. Pay attention to your shadows.
Once you've found a good light source, consider where your shadows are falling. If you are photographing your kids outside, think about the time of day. Early morning and later in the afternoon will give you more dramatic directional shadows. I love to shoot people about an hour before sunset. The light is still enough to get a good exposure but no one is blinded when facing the sun. If you do happen to find yourself shooting at noon day, a good way to avoid harsh shadows is to find shade. ( I know, it sounds counter-intuitive, but just go with me here.) Find the shade of a large tree or the open shade of a building. In these spots the light is dispersed and you'll have less of a chance of unattractive shadows. If no open shade is available, try turning 45 degrees from the direction of the sun on a bright day. Luckily, if you live in the greater Pudget Sound, like me harsh shadows are rarely a problem between the months of November-June. Cloud cover provides a natural diffusion of the light (ie- the direction of the light is broken up as it passes through the clouds creating soft shadows and the same kinds of light you'll find in open shade).
3. Get Closer.
Not every image needs to be a panoramic photograph. Instead try to fill the viewfinder or screen with only information you want and nothing you don't need. Portraits are about p eople. Feel free to include them specifically. This doesn't mean you never take a full body shot of your kids, but it is good to think a little bit about how the composition will look and if additional "stuff" will be distracting.
4. Play with angles.
It's fun to see things from a new perspective. Try getting high above, or down low. Even tilting the camera a little so your subject isn't perfectly perpendicular to the horizon. Images photographed from eye level (the view you see normally when standing up) is well, boring. Mix it up. Just ask any of my clients. I'm not opposed to laying on the ground for a photo. Some of my favorites come from this angle.
This photo of Hannah is photographed from above which emphasizes her size and face.
5. Don't always worry if they are smiling. My favorite photos are many times the ones where you can see what the kid is thinking. Have fun with them, don't make them hate photo time by always requiring perfection. My kids love to have their pictures taken because I let them do whatever they want.

Now at 4 and 3, they have developed their own favorite poses and they even ask "Mommy, can we take pictures?" What I love about this last picture is the "baby pout" on Hannah's face. Those Gerber baby cheeks are accentuate and she's staring right at me. Plus look at how blue those eyes are? Super cute, but no smile. I love it.
Thanks Heidi for the fun afternoon and such a cooperative model.
Yesterday a friend of mine and I photographed her daughter in my studio. My friend is an amateur photographer, but a quick study. Hanging out with her and sharing some tips on how to use her fancy new camera gave me the idea of posting a few tips for every Mom or Dad who wants to take better photos of their kids at home.
1. Loo
 k for great light: Forget your on camera flash.
Either take your kids outside and use the best light source in the universe (you know, the Sun?) or during the day use the lovely soft light of a window, skylight, or open door. Keep in mind that photographs are a 2 dimensional representation of a 3 dimensional object. Using the on camera flash creates flat, straight forward lighting that will make your kids look lifeless and many times, overexposed. If you are using a SLR camera you can adjust your ISO to increase the camera's sensitivity to the light. Keep in mind this also increases noise. Many point and shoots also allow you to increase your ISO or they automatically adjust to lower light. Most of all keep in mind that photography is all about light and that it might not be a good idea to always shoot in low light conditions if you want good images. In the image to the left you can see a slight shadow on the left side of Hannah's face. Here the light source was from my right side, about 45 degrees from me and the camera. This subtle shift in the direction of the light makes her look natural. The flat lighting of an on camera flash would have also created harsh shadows under her chin and along one side of her body; not attractive. Good images have a great balance of light and shadow. In summary; they mimic the way our eyes are used to seeing things in real world.
2. Pay attention to your shadows.
Once you've found a good light source, consider where your shadows are falling. If you are photographing your kids outside, think about the time of day. Early morning and later in the afternoon will give you more dramatic directional shadows. I love to shoot people about an hour before sunset. The light is still enough to get a good exposure but no one is blinded when facing the sun. If you do happen to find yourself shooting at noon day, a good way to avoid harsh shadows is to find shade. ( I know, it sounds counter-intuitive, but just go with me here.) Find the shade of a large tree or the open shade of a building. In these spots the light is dispersed and you'll have less of a chance of unattractive shadows. If no open shade is available, try turning 45 degrees from the direction of the sun on a bright day. Luckily, if you live in the greater Pudget Sound, like me harsh shadows are rarely a problem between the months of November-June. Cloud cover provides a natural diffusion of the light (ie- the direction of the light is broken up as it passes through the clouds creating soft shadows and the same kinds of light you'll find in open shade).
3. Get Closer.
Not every image needs to be a panoramic photograph. Instead try to fill the viewfinder or screen with only information you want and nothing you don't need. Portraits are about p
 eople. Feel free to include them specifically. This doesn't mean you never take a full body shot of your kids, but it is good to think a little bit about how the composition will look and if additional "stuff" will be distracting.
4. Play with angles.
It's fun to see things from a new perspective. Try getting high above, or down low. Even tilting the camera a little so your subject isn't perfectly perpendicular to the horizon. Images photographed from eye level (the view you see normally when standing up) is well, boring. Mix it up. Just ask any of my clients. I'm not opposed to laying on the ground for a photo. Some of my favorites come from this angle.
This photo of Hannah is photographed from above which emphasizes her size and face.
5. Don't always worry if they are smiling. My favorite photos are many times the ones where you can see what the kid is thinking. Have fun with them, don't make them hate photo time by always requiring perfection. My kids love to have their pictures taken because I let them do whatever they want.

Thanks Heidi for the fun afternoon and such a cooperative model.
Saturday, December 19, 2009
Now that you're Engaged... How to plan a Wedding!
Christmas is just a few days away now and thanks to very strong marketing measures by the jewelry industry, many people all across America will be start planning their weddings come the new year. If on Christmas morning you find an engagement ring under the tree with your name on it, you're in for a fantastic journey.
Over the years I've talked to literally tens of thousands of brides and grooms, photographed hundreds, and listened to one too many horror stories! So I'd like to put my two sense in and provide some pointers to those of you who will be filing your taxes jointly in 12012.

1. Be prepared. I'm going to assume that your engagement was a while in the making and you've had time on your hands already to dreamily surf the internet looking at dresses and bouquets. Now is the time to step into the big leagues and do some serious research. The first thing you'll need to do is make a list of all the services you might need and then prioritize them according to when they need to be completed. Here's a sample list to get you started. When you do contact different vendors be prepared with a specific set of questions. Knowing what you want before you start searching saves everyone time and helps you from loosing your mind.

2. Attending wedding shows can be a great place to start. Go prepared to meet vendors you've already researched, find new options you hadn't thought about, and end your day with sore feet. Too many brides attend wedding shows without a thought as to what they want to accomplish. Do yourself a favor and decide what your wants and needs are prior to attending, that way if you find what you've been looking for you can jump on it before some other bride does! Keep in mind that the most popular dates (Saturdays June-September) will book up fast. Vendors like myself specialize in providing quality to the customer so we have a select clientele. If a vendor you want is available at the wedding show put down a deposit! What's that saying again? Oh yah, "to the victor goes the spoils." It's happened many times to me, I've met a potential client at a wedding show, they talked about booking decided to sleep on it, called a few days later only to find I booked their date in the intervening time.

3. The thought of deposits brings me to my next point. Set a budget. This can be hard to do since most people have never planned a wedding and don't know how much things cost! On average Americans spend between $25,000-$30,000 on a wedding. That doesn't mean you'll be spending that exact amount, it is an average after all. Vendors are priced based upon that figure, their competition, and knowledge of what the market will bare. For example, I know that most brides spend 10% of their wedding budget on photography so I have an all inclusive package for $2500. For that price you'll get, 2 photographers, all day photography with unlimited time, a DVD of all the files, and online ordering. There are packages lower and higher then this one designed for all kinds of budgets. Year after year, the package I just described has been my most popular. My suggestion? Take the list of services you created earlier and rank them in order of importance and then decide how much of your total budget you are willing to spend on that service. Try to avoid skimping on the venue, photography, and DJ since these three things will have the most lasting impact on how nice your wedding looks, and how smoothly it runs.

4. Don't overlook the details. Save the date postcards may seem trivial in the grand scheme of things but they can make or break a guest list. Taste all the foods your caterer offers prior to finalizing the menu; same things goes for the cake. Consider what time the sun will set for outdoor weddings and/or receptions. Depending on the time of year and your location in the world this changes! Talk to your photographer and choose the time of day that will create the best images.
5. Don't obsess either! There are things you won't be able to get done and others that won't go as planned. On the day of the wedding, have the maid of honor or another trusted person be "The Go to Guy or Gal" for any problem that may arise. This should be someone that knows what you would want done and how to execute it. Better yet, hire a coordinator, that is money well spent!

6. Be considerate of your guests, family and friends. Yes, it is your day, but please don't loose sight of the fact that you and your new husband are the hostess and host! Take into consideration the needs and wants of others. Apply diplomacy liberally but know when to stand your ground. Be prepared to make concessions to please new In-laws and avoid unnecessary contention. This will go a long way to creating a fun filled event for everyone.
To any bride reading this blog, congratulations! I hope you find these tips helpful, and just as importantly, please consider visiting my website and having me photograph your wedding! Irene Jones Photography Online has package listings, portfolio samples and more information about how I hard work to make your wedding day a success.
Over the years I've talked to literally tens of thousands of brides and grooms, photographed hundreds, and listened to one too many horror stories! So I'd like to put my two sense in and provide some pointers to those of you who will be filing your taxes jointly in 12012.

1. Be prepared. I'm going to assume that your engagement was a while in the making and you've had time on your hands already to dreamily surf the internet looking at dresses and bouquets. Now is the time to step into the big leagues and do some serious research. The first thing you'll need to do is make a list of all the services you might need and then prioritize them according to when they need to be completed. Here's a sample list to get you started. When you do contact different vendors be prepared with a specific set of questions. Knowing what you want before you start searching saves everyone time and helps you from loosing your mind.
- Venue- Book up to 2 years in advance or more depending on location
- Catering (if not provided by the Venue) -12-18 months prior
- Photography - 12-24 months in advance
- DJ or other Musical entertainment- 12-14 months before the wedding
- Invitations- 12 months prior
- Wedding Dress- Start trying them on ASAP but be choosy about what you buy! Buy at least 8 months before the wedding to leave time for alterations.
- Groom's Tux- 3-6 months before the big day
- Bridesmaids Dresses- Same as wedding dress
- Groomsmen's Tuxes- same as Groom's tux
- Cake (if not provided by the Caterer or Venue)-3-6 months ahead
- Florist (some Venues also provide this service)-3-9 months ahead
- Transportation (Limo, Hotels for you and out of town guests)- 4-6 months ahead
- Favors- depending on what you are planning this varies, keep in mind that custom items take longer to produce.
- Additional items: Linens, chair and table rentals, decorations, etc.- 2-4 months before.

2. Attending wedding shows can be a great place to start. Go prepared to meet vendors you've already researched, find new options you hadn't thought about, and end your day with sore feet. Too many brides attend wedding shows without a thought as to what they want to accomplish. Do yourself a favor and decide what your wants and needs are prior to attending, that way if you find what you've been looking for you can jump on it before some other bride does! Keep in mind that the most popular dates (Saturdays June-September) will book up fast. Vendors like myself specialize in providing quality to the customer so we have a select clientele. If a vendor you want is available at the wedding show put down a deposit! What's that saying again? Oh yah, "to the victor goes the spoils." It's happened many times to me, I've met a potential client at a wedding show, they talked about booking decided to sleep on it, called a few days later only to find I booked their date in the intervening time.

3. The thought of deposits brings me to my next point. Set a budget. This can be hard to do since most people have never planned a wedding and don't know how much things cost! On average Americans spend between $25,000-$30,000 on a wedding. That doesn't mean you'll be spending that exact amount, it is an average after all. Vendors are priced based upon that figure, their competition, and knowledge of what the market will bare. For example, I know that most brides spend 10% of their wedding budget on photography so I have an all inclusive package for $2500. For that price you'll get, 2 photographers, all day photography with unlimited time, a DVD of all the files, and online ordering. There are packages lower and higher then this one designed for all kinds of budgets. Year after year, the package I just described has been my most popular. My suggestion? Take the list of services you created earlier and rank them in order of importance and then decide how much of your total budget you are willing to spend on that service. Try to avoid skimping on the venue, photography, and DJ since these three things will have the most lasting impact on how nice your wedding looks, and how smoothly it runs.

4. Don't overlook the details. Save the date postcards may seem trivial in the grand scheme of things but they can make or break a guest list. Taste all the foods your caterer offers prior to finalizing the menu; same things goes for the cake. Consider what time the sun will set for outdoor weddings and/or receptions. Depending on the time of year and your location in the world this changes! Talk to your photographer and choose the time of day that will create the best images.
5. Don't obsess either! There are things you won't be able to get done and others that won't go as planned. On the day of the wedding, have the maid of honor or another trusted person be "The Go to Guy or Gal" for any problem that may arise. This should be someone that knows what you would want done and how to execute it. Better yet, hire a coordinator, that is money well spent!

6. Be considerate of your guests, family and friends. Yes, it is your day, but please don't loose sight of the fact that you and your new husband are the hostess and host! Take into consideration the needs and wants of others. Apply diplomacy liberally but know when to stand your ground. Be prepared to make concessions to please new In-laws and avoid unnecessary contention. This will go a long way to creating a fun filled event for everyone.
To any bride reading this blog, congratulations! I hope you find these tips helpful, and just as importantly, please consider visiting my website and having me photograph your wedding! Irene Jones Photography Online has package listings, portfolio samples and more information about how I hard work to make your wedding day a success.
Friday, December 18, 2009
I like this one

Thursday, December 17, 2009
Stock Photography: How To Sell Your Photos
I feel like yesterday's post may have been a little disappointing. To anyone that started reading with great hope and then had their dreams come crashing down when they added up the total for all of the equipment I suggested, don't give up. Here is a beacon of hope! It is completely possible to support your equipment buying habit with selling your photos. The answer is stock photography.
Nearly all the ad images you see on the internet, magazines, any sort of print media come from stock. Why? It's more affordable for companies and ad agencies to use stock then hire a photographer for every image they need. Anything can be a stock image, landscapes, people (especially people), food, etc. It just has to be marketable. Before you ask, your dog is rarely going to be a marketable subject matter. That is unless your target audience is a dog food company!
To shoot stock you'll need to do a few things:
I've done some research and here are some sites that will help you decide if stock photography is right for you and how to break into the market. Happy research!
Selling Stock Photography
How to Sell Stock Photos
Micro Stock: How to Sell your Photos
Microstock Forum
Nearly all the ad images you see on the internet, magazines, any sort of print media come from stock. Why? It's more affordable for companies and ad agencies to use stock then hire a photographer for every image they need. Anything can be a stock image, landscapes, people (especially people), food, etc. It just has to be marketable. Before you ask, your dog is rarely going to be a marketable subject matter. That is unless your target audience is a dog food company!
To shoot stock you'll need to do a few things:
- Come up with a concept for a photo that people will be willing to buy (ie think in terms of who will buy your image and what they might need).
- Shoot that image and every possible variation of it. Make sure it's sharp, well exposed and high resolution.
- Submit it to stock agencies keeping in mind that rejection rates are high.
- Wait, probably a long time, and hope for the best.
- Repeat thousands of times over! I'm not kidding, you'll need a lot of winning images if you plan to retire early and live off of royalties. The key to making money here is simply to have a lot of different photos that are specifically targeted to a particular audience. The more images you have the better rate of return you'll get.
I've done some research and here are some sites that will help you decide if stock photography is right for you and how to break into the market. Happy research!
Selling Stock Photography
How to Sell Stock Photos
Micro Stock: How to Sell your Photos
Microstock Forum
Wednesday, December 16, 2009
Equipment Needs for Starting Your Own Photography Business
No photo today, instead I'm answering the question I hear all the time, "If I want to be a professional photographer, what do I need?" So today I'm playing personal shopper.
Since I started shooting professionally my work habits and subsequently my equipment have evolved. With each new toy my style shifted towards a new method. For the bulk of my career I have been a location and event photographer. My desire to eat and pay off my school loans was more pressing then having my name displayed across a store front window. This last year was my chance to" have it all" you might say. I took advantage of the extreme desperation of many landlords in the commercial real estate market and got myself a studio. Unlike a lot of other photographers, I've never wanted to work for National Geographic or Rolling Stone. I always wanted to be my own boss and retire early thanks to the success of my portrait studio. This year I'm one step closer and feeling like I should generously share some of my wisdom with someone standing in the same spot I was 10 years ago.
If I had it all to do over again, and the desire to max out a credit card, this is what I'd buy to help me start my photography business. I'm cheep, so I chose affordable but quality products. That said; be prepared for sticker shock.
1. Camera: Nikon D3s is what I'd but tomorrow if I needed another camera, even though it's a little weightier then I'd like. I would just need more VR lenses. Currently I'm using a D300 which I love, but it's missing a few things the D3s has, like a full frame sensor and HD video. $5,200.
2. Lighting equipment: I've looked into and used most equipment on the market. I used Speed-a-tron and Profoto almost exclusively in college. (So many trips to the rental counter at Glazers.) When I finally decided to jump in I bought a White Lighting monolight kit after months of research. For what I do (weddings and portraits) I've been very happy. I bought my equipment one piece at a time since that's all I could afford but the best deal is their professional package. I wouldn't use their light stands though, not my favorite. Price tag: just under $2400 for pretty much everything they offer in one package. You'll need to add a vagabond battery pack or two for $300 each to complete the shopping spree.
3. For when you plan to be a little more portable, I like the Nikon Speedlight series. I suggest having a half a dozen on hand if you plan on going this route and skipping the "big lights" all together. Buy a SB900 for it's ability to control all of the other units and the range, then finish out the group with SB600s since they will be just working on remote. You might also consider the R1C1 flash since this is great for fill on portraits as well as macro.
4. Lenses: Which lenses you buy depends on what you shoot. Portrait photographers can't be without a 85mm and 50mm. If you're shooting weddings like me, you'll want to add a wide angle, say 12mm) and a telephoto, like a 200mm (or whatever you like best) for those weddings where you can't leave the choir loft of the church. It's up to you if you decide to do zoom lenses or prime. This is where you want to spend your money though. Choose a lens with sharp glass that can open to at least F3.5. Here are some of my favorite lenses:
Tomorrow: Now that you've decided against being your own boss, how to get a job as a photographer... Just kidding, those jobs are all taken. Semi colon right side parentheses. ;)
Since I started shooting professionally my work habits and subsequently my equipment have evolved. With each new toy my style shifted towards a new method. For the bulk of my career I have been a location and event photographer. My desire to eat and pay off my school loans was more pressing then having my name displayed across a store front window. This last year was my chance to" have it all" you might say. I took advantage of the extreme desperation of many landlords in the commercial real estate market and got myself a studio. Unlike a lot of other photographers, I've never wanted to work for National Geographic or Rolling Stone. I always wanted to be my own boss and retire early thanks to the success of my portrait studio. This year I'm one step closer and feeling like I should generously share some of my wisdom with someone standing in the same spot I was 10 years ago.
If I had it all to do over again, and the desire to max out a credit card, this is what I'd buy to help me start my photography business. I'm cheep, so I chose affordable but quality products. That said; be prepared for sticker shock.
1. Camera: Nikon D3s is what I'd but tomorrow if I needed another camera, even though it's a little weightier then I'd like. I would just need more VR lenses. Currently I'm using a D300 which I love, but it's missing a few things the D3s has, like a full frame sensor and HD video. $5,200.
2. Lighting equipment: I've looked into and used most equipment on the market. I used Speed-a-tron and Profoto almost exclusively in college. (So many trips to the rental counter at Glazers.) When I finally decided to jump in I bought a White Lighting monolight kit after months of research. For what I do (weddings and portraits) I've been very happy. I bought my equipment one piece at a time since that's all I could afford but the best deal is their professional package. I wouldn't use their light stands though, not my favorite. Price tag: just under $2400 for pretty much everything they offer in one package. You'll need to add a vagabond battery pack or two for $300 each to complete the shopping spree.
3. For when you plan to be a little more portable, I like the Nikon Speedlight series. I suggest having a half a dozen on hand if you plan on going this route and skipping the "big lights" all together. Buy a SB900 for it's ability to control all of the other units and the range, then finish out the group with SB600s since they will be just working on remote. You might also consider the R1C1 flash since this is great for fill on portraits as well as macro.
4. Lenses: Which lenses you buy depends on what you shoot. Portrait photographers can't be without a 85mm and 50mm. If you're shooting weddings like me, you'll want to add a wide angle, say 12mm) and a telephoto, like a 200mm (or whatever you like best) for those weddings where you can't leave the choir loft of the church. It's up to you if you decide to do zoom lenses or prime. This is where you want to spend your money though. Choose a lens with sharp glass that can open to at least F3.5. Here are some of my favorite lenses:
Nikon 16-85mm f/3.5-5.6G ED VR AF-S DX Nikkor Lens
Nikon AF-S Nikkor 50mm f/1.4G Autofocus Lens
Nikon AF-S Zoom Nikkor 14-24mm f/2.8G ED AF Lens
Nikon PC-E Micro Nikkor 45mm f/2.8D ED Manual Focus
Nikon Telephoto AF Nikkor 85mm f/1.4D IF Autofocus Lens
Sigma 70-200mm f/2.8 II EX DG APO Macro HSM AF Lens for Nikon
5. Reflectors! I've mentioned before you can use foam core for a white reflector and many craft stores sell these in large sizes. $20.00 is a nice price for a solution. You might also want to pick up a few collapsible reflectors. A silver and gold both can come in handy and having larger sizes help to light more people on location and in studio.($80 each) Most importantly, a large translucent reflector for when you need to use speedlights but you want to diffuse them over a wider distance. Smaller reflectors can come in handy too, plus fit into an overhead compartment.
6. For Backgrounds I use a white vinyl seamless since it's durable and easy to clean.($250) For a less expensive option you might try seamless paper, but be careful, one crease or puncture can equal many cumulative hours of post processing time you'll never get back.
7. You'll also want to pick up wireless transmitters for the "big lights", light stands and modifiers and filters, a lifetime supply of duct and gaffer's tape, some very sturdy hard cases to hold your equipment, and a bachelor's in business management.
I'm not kidding about the last one. Going pro isn't necessarily about being talented and hoping "the work will sell itself." That's your job. You'll need to study up on current marketing trends and write a business plan for the loan you'll be taking out to pay for all this junk. Once that's done you'll need to spend a lot of time praying! I promise you no successful small business owner is an atheist. The first thing you realize when you strike out on your own is that you need divine assistant if you're ever to get off the ground. No matter how talented you are or not, you have to be incredibly self motivated to work freelance or be a business owner. Be honest with yourself and analytical before committing to anything. You're in for more then a full time job, since you'll be an accountant, receptionist, customer service team, tech support, and if you're lucky you'll have time to shoot once and a while! So, why do I do it you ask? Because I wouldn't want to live any other way. To those that share my sentiment, I wish you great success and I hope to be reading your blog soon!
Last tip: Never stop learning. Read every blog, book, or magazine even remotely related to photography. Always try new things and constantly work to improve your portfolio. Challenge your self to do things differently and learn from every bad exposure. Be prepared to bore anyone that asks you a photo question with long winded answers that go above and beyond what they actually wanted to know, and hire an assistant that you want to hang out with.
Tomorrow: Now that you've decided against being your own boss, how to get a job as a photographer... Just kidding, those jobs are all taken. Semi colon right side parentheses. ;)
Tuesday, December 15, 2009
Studio Lighting Part 5: More for your Money


A few gels and a half a stop under exposure turned the background from 50% gray to purple, then blue, and red all in the same shoot. (Though I don't have a good example of the red- not fond of the model). For Yellows and greens and other lighter colors I'd suggest using a white background as a base and underexposing the background more. Plus you need to create a lot of density by using several filters. Use all of the same color for the primary shades or a combination of two different colors for secondary shades. If that's confusing please Google "color wheel" and you'll see how endless the possibilities are. Experimentation is the key to success here, but it's better done on your own time, not your clients.
Gray can also be done on a white background. Just turn off the background lights! Always light your subject and background separately when trying these techniques and you'll be just fine. Shoot some and post links. I want to see! Don't have a seamless white background? Try a white bed sheet. If you own accessory flash units you probably own a variety of filers and don't even know it. My Nikon Speedlights came with a bunch all designed to fit into a specially designed holder that came with the SB-900. Very handy little guys.

Tomorrow: Looking for a beginners list of what you should buy for a home studio? Well tomorrow's your lucky day...
Monday, December 14, 2009
Studio Lighting: Part 4


Sunday, December 13, 2009
Studio Lighting: Part 3- Shooting on a white background

 The key to photographing on a white background is simple, over expose the background while avoiding lens flair, and exposing your subject correctly. Sounds easy yes? Well there are a hundred and one ways to do it and depending on your subject matter the techniques change. I'm going to focus on portraiture since that's what I do, but below are some links to tutorials that discuss how to work with a white background when shooting products, on location, etc. For the family portrait above the set up is simple. Key light is at camera right with two background lights pointing directly on the background. Exposure is 1/200 @F13 ISO 200. The background lights are parallel from each other. This keeps the background evenly lit so there is no shadow or gradation of tone where the light would fall off. There was no need for any other fill lighting since the white background actually does a great job of acting as it's own fill card.
 For the next image Terice is modeling (She loves to have her photo taken which is good because I'm always using her as a stand in!) The set up here is your classic three light pattern: Key at camera left (and about 20 degrees from me for a broad light across the face), background light directly behind her, and rim light for the hair and a little fill. Oh and Terice (since I know you're reading this) that was a great hair day for you. Exposure for this image is 1/250 @F7.1 ISO 200. The thing I like best is the rim light on her neck and jaw. I love it when my shadows are delicate and the light is playful. It makes people look great and in turn they think I'm some sort of magician.
  Later this month I'm photographing a huge family group. There are two many of them to shoot all together so instead I'll be shooting them on a white background individually and then creating a panorama in photoshop. The white background makes it easy to combine (no long hours required) and shooting the people individually makes for great smiles on everyone instead of a group photo that is so-so. Don't worry I'll blog about that with details of the shoot and post processing. For now you'll have to spend your time pouring over these other blogs and become a master at the trendy/timeless look of the seamless white background.
.
Saturday, December 12, 2009
Studio Lighting Basics: Part 2 Using a fill light.
 If you did your homework yesterday and studied the vocabulary words I gave you, then you are ready to talk about using fill. There are a lot of different methods for adding fill light. The easiest is using a fill card or reflector. I have white foam core (the kind used for mounting prints) in a couple of sizes that I use for fill cards. I also have a collapsible 4-in-1 reflector that I take everywhere. The reflector is far more portable then the foam core but both are often needed when trying to use one light head to create two sources of light.
 Our first picture (top left) is with a single light head placed at 45 degrees from the subject (my husband) and me on camera left. You can see how the contrast between the highlights and shadows is pretty dramatic and a good portion of the face is quite dark. On the second image I added a white fill card. Notice how the shadow side is now about a half stop lighter? The lighting ratio has gone from 4:1 to 3:1. Most traditional portraits are either a 2:1 ratio since it allows for some shadow but there is still detail. (See earlier posts for more info on this subject.) The fill card is positioned at 90 degrees from Caleb. Next the white fill card is replaced by a silver reflector. The quality of light on the shadow side has changed. The silver reflector is brighter then the white fill card. Now we're up to a 2:1 ratio. Finally I flipped the reflector over to the gold side. The intensity of the light is about the same as the silver side, but the color shift is the most obvious change.
 Keep in mind a reflector does just that, it only can bounce light already available in a new direction. If you want a greater intensity or light from an angle not directly proportional to your main light you'll need to use flash as your fill. On the next image (right) you can see the fill light on camera left bringing up the shadow side of his face to be as bright as the main light, maybe even a little brighter. Because the fill is positioned slightly behind the subject instead of next to him like a reflector might be, a small sliver of shadow is created along his temple and cheek bone. This kind of lighting style really adds three dimensionality to the image. The key light is diffused where the fill is not, and because of the angle, the fill light has become very textural.
 Can you guess how old this kid is? Would you believe me if I said 3? It's true, the posing and lighting make him look older then his age and I did this intentionally. I had plenty of photos of him being goofy like all little boys are, what I wanted next was something that spoke to a different emotion. Unlike shooting on location where you have a sense of place to help tell a story, in the studio you have only the light and your subject. Light is your only tool to create a fresh perspective. That challenge alone is what keeps my job new and interesting.
 Before anyone asks, about how I got the white background to be clean and even I'll admit that I did something I don't normally do, I used the fill light as both a background and fill light simultaneously. Most of the time I use a light for the background separately since I want to be able to control each layer of the scene, but I was able to get away with this for a few simple reasons.
 The background I used was only 5' wide and my subject is standing pretty close to it. Normally I try to put distance between the subject and the background so no shadows fall on the vertical plain, but I didn't need to worry about this because the fill light was positioned in such a way that it's light illuminated both the side of the subject and the background. The fill light was powered to full and with it's close proximity to the background it was far more intense then the main light which was only at half power. This is what caused the background to loose all detail since the camera's exposure was set to match the main light's setting. (1/320 @ F6.3 with ISO 200) In simpler terms, I over exposed the background.
Next up we will talk more in detail about shooting on a white background and the traditional three light setup that has defined studio portraiture.
Friday, December 11, 2009
Studio Lighting Basics: Part 1 "Feel the Light"
In college one of my more ego maniacal instructors (keep in mind they ALL fit into this category) brought in a single light head on a stand with a soft-box to class. He had the entire group stand with arms out in front of it repeating "I feel the light!" as if we were impersonating a gospel choir. His point? At a certain level you need to act instinctively about how you use light. Studio photography is the best example since you have complete control over every light source and direction. So I want to take the next few days and go over some of the basics about how to light in a studio and why the classics work so well. Then I want to talk about breaking out of the box and doing things differently. That's where the whole "Feeling the Light" really matters. So please to anyone reading, take what you see here, and apply these techniques creatively; by all means make it your own! That's what art is all about, yes? I'll provide the method you're responsible for the mood.
First thing first, think of light as your most basic tool. Keep in mind how changing light alters the emotion of an image and where it's placed is the key to telling a subject's story. And everything has a story. How interesting it is, well, that's up to you.
So let's start with some lingo.
Key (or main) Light: Just what it sounds like. This is normally the brightest light in the set up. Often times it's that big glowing ball in the sky.
Fill Light: This is the light, or sometimes a reflector that fills in the shadows to help reduce contrast or illiminate shadows all together.
Background Light: The light that illumniates the background.
Hair Light or Rim Light: A light positioned behind the subject and sometimes what helps to separate the subject and background from one another.
Monolight: Flash unit that is self contained and uses AC power.
Lens Flair: Light that is reflected back into the camera lens. Not fun to try to remove in post processing.
Lighting ratio: A mathematical way of describing how bright the main light is compared to the fill light.
Wireless Remote: Sounds redundant I know, but these little guys, AKA radio transmitters, signal flash units from the camera so all units fire simultaneously.
Diffuser: A device used to disperse light and soften shadows. A few popular ones are: softboxes, unbrellas (reflective and translucent) a beauty dish and diffusion sock, etc.
Specular Highlight: A bright spot of light that appears in shiny objects. Often called catch lights when observed in portraits, this is the glow you see in people's eyes. It is also the easiest way to determine how a photograph was lit. I simply look for the reflection in the subject's eyes to tell me how to recreate the same shot.
Reflector: A surface that reflects light. (Obvious I know) They come in many varieties. Gold and silver reflectors add either a warm or cool tone to an image where white stays color neutral. The bigger the reflector, the more diffused the light. The closer the reflector is to the light source the greater the intensity of the reflected light.
Okay let's start off small. Let's talk about lighting with just a key light and go from there.

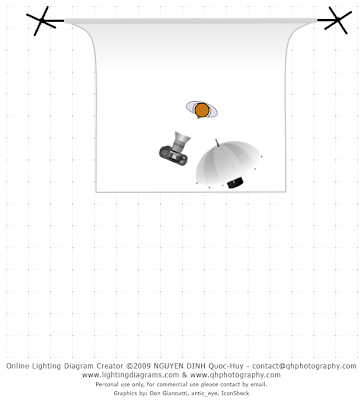
All you Anne Geddes fans here's a knock off for you. This image used a single key light and my husband draped in black fabric. I know what you're thinking, and no he won't wax his arms for a re-shoot. This kind of image is very popular (can't quite figure out why) and easy to do. My key light was a single unit pointed towards the ceiling at a 45 degree angle to give it some direction and its positioned a little bit off of camera right. By pointing the light up it filled the whole room and broadly lit both baby and my toga wearing husband. ( I should have gotten a photo of him to show you. Especially since the whole thing was held on by a few "A" clamps in the back. Pretty hilarious actually.) Here's a diagram to help illustrate. I used an umbrella since it was already on the light-stand and any extra diffusion is okay with me, but the ceiling is really what did the work. As I said before, the larger the area light can reflect off of, the more dispersed it will be. Nine foot ceilings painted white are a portrait photographer's best friend when on location. Luckily for me the same trick works in my studio as well.
 One thing I do need to mention here is that this lighting method (sometimes referred to as a broad lighting pattern) means that in the original image there was a good amount of detail visible in the black material around Caleb's body. There are two ways to correct this:
One thing you have be careful of when using one light source is separation. Does the shadow areas on your subject blend into the background? This mistake is most commonly made when the subject has dark hair and the background is black or they have on dark clothing. It creates what I like to call FHS or Floating Head Syndrome. Again this reinforces the point I made earlier, you must "Feel the Light" and that means controlling it! When one light won't do, you add another, or a reflector, until you've correctly lit your subject in a way that is pleasing and distinguishable.
Tomorrow we'll expand on this same idea and move up to two lights sources.
First thing first, think of light as your most basic tool. Keep in mind how changing light alters the emotion of an image and where it's placed is the key to telling a subject's story. And everything has a story. How interesting it is, well, that's up to you.
So let's start with some lingo.
Key (or main) Light: Just what it sounds like. This is normally the brightest light in the set up. Often times it's that big glowing ball in the sky.
Fill Light: This is the light, or sometimes a reflector that fills in the shadows to help reduce contrast or illiminate shadows all together.
Background Light: The light that illumniates the background.
Hair Light or Rim Light: A light positioned behind the subject and sometimes what helps to separate the subject and background from one another.
Monolight: Flash unit that is self contained and uses AC power.
Lens Flair: Light that is reflected back into the camera lens. Not fun to try to remove in post processing.
Lighting ratio: A mathematical way of describing how bright the main light is compared to the fill light.
Wireless Remote: Sounds redundant I know, but these little guys, AKA radio transmitters, signal flash units from the camera so all units fire simultaneously.
Diffuser: A device used to disperse light and soften shadows. A few popular ones are: softboxes, unbrellas (reflective and translucent) a beauty dish and diffusion sock, etc.
Specular Highlight: A bright spot of light that appears in shiny objects. Often called catch lights when observed in portraits, this is the glow you see in people's eyes. It is also the easiest way to determine how a photograph was lit. I simply look for the reflection in the subject's eyes to tell me how to recreate the same shot.
Reflector: A surface that reflects light. (Obvious I know) They come in many varieties. Gold and silver reflectors add either a warm or cool tone to an image where white stays color neutral. The bigger the reflector, the more diffused the light. The closer the reflector is to the light source the greater the intensity of the reflected light.
Okay let's start off small. Let's talk about lighting with just a key light and go from there.

 One thing I do need to mention here is that this lighting method (sometimes referred to as a broad lighting pattern) means that in the original image there was a good amount of detail visible in the black material around Caleb's body. There are two ways to correct this:
 - GOBO the light. This stands for "GOes Before Optics" and is basically anything that is dark that will be put in front of a light source to change how it looks. Black matt board is a cheep and easy solution. Hang a few of these from light stands or have an assistant hold them in place so as to remove light that was falling on spots it shouldn't be.
- Use the Dodge and Burn tool in Photoshop.
One thing you have be careful of when using one light source is separation. Does the shadow areas on your subject blend into the background? This mistake is most commonly made when the subject has dark hair and the background is black or they have on dark clothing. It creates what I like to call FHS or Floating Head Syndrome. Again this reinforces the point I made earlier, you must "Feel the Light" and that means controlling it! When one light won't do, you add another, or a reflector, until you've correctly lit your subject in a way that is pleasing and distinguishable.
Tomorrow we'll expand on this same idea and move up to two lights sources.
Thursday, December 10, 2009
Why reshooting isn't a bad thing.
My husband told me a story yesterday about a co-worker of his who's relative heard about this blog and has a lot of love for photography. Apparently he's now following my blog like a religion and trying to do some of the techniques I've written about. I'm completely flattered and shrinking under the mounting pressure. I can't spell for my life and my grammar is terrible. To all my unseen minions I hope none of you can read past an eight grade level and my slaughtering of the English language goes unnoticed. Seriously though, a big thanks to anyone taking the time to read my self-aggrandizing propaganda that some might confuse with a photography guide.

Now please forgive me as I post more photos of my son. He's a month and two days old now and I can't help but think he's getting cuter every day. He started smiling at me (but only when the camera is put away of course) and I can't wait to catch a big fat smile and post it all over the internet. The first shot shown was done at my studio the other night. This is as close to a smile as he would give. Just watch this child will be my "serious one" and I'll end up with thousands of images of his first year, all of which lack facial expression.
The next image is my re-shoot of the Christmas card photos. This is more of what I was originally thinking when I designed the shot in my head. Sometimes it takes several re-shoots before I get an image just right and honestly I think it's a good thing to revisit an idea until you've perfected it. For me making an image is often like a chemistry experiment; that is, you need to apply the scientific method. Let's compare the two:

I'm still not perfectly happy with this shot. I may shoot again until it's exactly what I see in my mind. I am thinking of using a wider angle and bring Alex a lot closer to the camera to make him larger in the frame so more of the Christmas tree is visible. I also want a more pleasant look on his face. Still haven't decided if I should put him back in the box. I know that the white wrapping paper, though a nice idea, didn't look as good as I had hoped. Plus I need to do this shot before he's old enough to talk back.
If I decide to do this shot again I'll post results. Until then I have plans to discuss studio lighting for the next few days. There is a lot of tutorials about shootings on a white background floating around the world wide web. I'm going to add my own say on the matter as well as how to shoot on black backgrounds.

Now please forgive me as I post more photos of my son. He's a month and two days old now and I can't help but think he's getting cuter every day. He started smiling at me (but only when the camera is put away of course) and I can't wait to catch a big fat smile and post it all over the internet. The first shot shown was done at my studio the other night. This is as close to a smile as he would give. Just watch this child will be my "serious one" and I'll end up with thousands of images of his first year, all of which lack facial expression.
The next image is my re-shoot of the Christmas card photos. This is more of what I was originally thinking when I designed the shot in my head. Sometimes it takes several re-shoots before I get an image just right and honestly I think it's a good thing to revisit an idea until you've perfected it. For me making an image is often like a chemistry experiment; that is, you need to apply the scientific method. Let's compare the two:
- First you must ask a question (or in the photographer's case, be given an assignment).
- Do research (consider the techniques and equipment the shot might require).
- Construct a hypothesis (location scout, draw diagrams and form a shot/pose list).
- Test with an experiment (shoot like there is no tomorrow)!
- Analysis and conclusion (Lightroom and Photoshop).
- Decide if hypothesis is true or false. Go back to step 3 if false (re-shoot.)
- Report results (blog about your image.)

I'm still not perfectly happy with this shot. I may shoot again until it's exactly what I see in my mind. I am thinking of using a wider angle and bring Alex a lot closer to the camera to make him larger in the frame so more of the Christmas tree is visible. I also want a more pleasant look on his face. Still haven't decided if I should put him back in the box. I know that the white wrapping paper, though a nice idea, didn't look as good as I had hoped. Plus I need to do this shot before he's old enough to talk back.
If I decide to do this shot again I'll post results. Until then I have plans to discuss studio lighting for the next few days. There is a lot of tutorials about shootings on a white background floating around the world wide web. I'm going to add my own say on the matter as well as how to shoot on black backgrounds.
Wednesday, December 9, 2009
Fish Eye Lens: Why fake it in photoshop when it's so much fun to shoot?

You want distortion, I'll give you some distortion! 10.5mm fixed focal length fish eye! I rented it for a shoot I did for a wedding magazine cover a few years back. Though they didn't end up using this image it's one of my favorites. It was a really bright summer's day in the early evening when we did this. You can see the touch of light on the bride's face from the sun behind them. The main light is actually my SB-800 on camera with no diffusion.
Anyone who's ever set foot on a "beach" in Washington state can agree that this is a distinctly Northwest beach (Alki to be exact) since no soft sand is anywhere to be found. Yes there is real sand on the Pacific Ocean side of the state, but here in the Sound nothing can compare that isn't man made. That said, the texture can be visually compelling.
My favorite part of this image is how the horizon and the drift wood bend in opposite directions. Word to the wise: before you add this lens to your Christmas list there are a few things you should know.
- When shooting with a severely wide angle lens place your subject at dead center since this will be the only spot free of distortion and the only spot really sharp.
- Watch where you stand. Your feet might be in every photo if you are not careful. I cloned my feet out of this image. While you are at it, be very careful of your background, more will be included then you'll be aware of.
- Know your camera's sensor. I have a Nikon D300; which is a crop frame sensor. This same lens on a full frame sensor camera is even wider! I want to buy Nikkor's 12-24mm wide angle zoom but honestly it won't be worth the investment until I buy a new camera body since I won't be able to see most of the area that is curving around the edges of the frame. Though, hats off the camera salesman at Glazers that totally sold me on the lens! I'll be back, camera guy- don't worry...
- Watch the lingo. There are two different types of wide angle lenses both with varying results. Rectilinear lenses (as the name suggests) produces straighter lines though some distortion will occur, Fish eye lenses produce the circular distortion the sample image illustrates.
- Be prepared for vignetting as part of the distortion. I like that look so, it;s a bonus for me.
- Bring a normal 50mm also, shoot the same subject with both lenses so you can see exactly how much changes with a different shaped glass. (Good learning tool.)
- Most of all try new things, lenses, angles, lighting styles, you name it! Experiment and learn from every frame and you'll a better photographer for it.
Tuesday, December 8, 2009
Correcting Lens Distortion in Photoshop
If you're like me and love wide angle you've come across some unwanted distortion a time or two. This mainly manifests itself around the edges of an image with bending and curvature. This can be a problem, especially when it happens to someone's head! For the image below you'll see in the before how large her hand looks, and her arm is probably 2 times as long as it should be. Since she's not a primate, this should be corrected. Here's how:
Original Image- (look at the left arm, she should be a basketball super star!)
Corrected Image- Still has a feeling of perspective, but her arm and face now look like they are supposed to be on the same body.
There you have it, one powerful filter to fix a host of distortions! It's also fun to use this same filter to add distortions and fake the look of a fish eye lens. Here's an example.
Distorted image: You'll notice how the distortion makes the subject separate from the background and then add curvature to the bridge in the background.

Original:

- Select Filter>Distort>Lens Correction. Depending on how your image is distorted you have a number of sliders to help correct the issue.
- Remove Distortion will help to bring an image back into proportion. This kind of problem often comes from fish eye lenses and other wider angle lenses. It is not as noticable with cropped frame sensors but it is very obvious with full frame senored digital cameras and traditional film cameras.
- Chromatic Aberration corrects color shifts.
- Vignetting, or a darkening around the edges of the frame. I often add a vignette for artistic means.
- Transform is what I used for the image below. First the Vertical perspective was adjusted to bring her face and arm back into correct proportion and then the Horizontal to shorten her right arm to the correct length. The image was then cropped since when you use this filter the edges of the image are no longer in their original position.


There you have it, one powerful filter to fix a host of distortions! It's also fun to use this same filter to add distortions and fake the look of a fish eye lens. Here's an example.
Distorted image: You'll notice how the distortion makes the subject separate from the background and then add curvature to the bridge in the background.

Original:

Subscribe to:
Posts (Atom)