Tuesday, November 3, 2009
Following the Golden Rule of Thirds
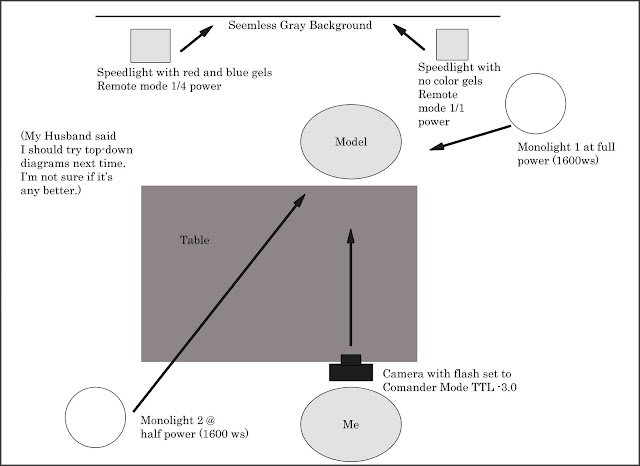
 The rule of thirds suggests that you break up an image into 9 quadrants and position your subject along the intersections. Here's what I mean. In the photo to the right her eyes are directly along the top half of the image and her body is mainly in the farthest right quadrant. It's a visually dynamic design, complimented by perfect lighting; if I do say so myself. In fact the lighting here is a combination of two monolight flash(s), three Nikon speed-lights, and a a few colored gels. Who wants to see a diagram detailing how I shot it? I thought you might.
The exposure ended up being 1/100 @ f 14 with an ISO of 200. This image was shot for Salon Dolche' in Everett, Washington. My goal was maximum shine and detail on the hair, so I used my hair-light (shown on the diagram as monolight 1) as my main light and pointed it directly at the back of her head. I wanted a narrow beam of light so I used tin foil to make a snoot. Why tin foil you say? Well the salon had tons of it on hand, plus it has a great reflective quality and it can be molded into any size or shape. It is great for creating specular highlights and it's cheep. The second monolight was turned to half power and acted as a fill on her face. I also used a speed-light to help fill in the right side of the model's cheek but since I didn't want to destroy the beautiful wrap around quality of the fill light off to my left, I stopped the speed-light flash attached to the hot-shoe down three stops so all it would do is soften shadows. (Note: this flash was set to commander mode so all lights would fire when the shutter was released) I also diffused the on camera flash and monolight 2 so the classic loop lighting pattern (the shadow on her cheek of her nose) wouldn't disappear, but stay soft. The two other speed-lights on the background were set to manual power in remote mode to illuminate the background and remove any shadows. I wanted a blueish purple to offset the red of the model's hair. By powering them at different levels I was able to create a gradient across the background. A lot can go into a simple shot, but being able to execute something exactly the way I've envisioned it in my head is always a joy.
The images submitted to Salon Dolche' were more then a hit and can be seen at their salon.
Tomorrow: Advice on how to photograph kids and help for parents on not stressing out during a photo session.
Subscribe to:
Post Comments (Atom)


No comments:
Post a Comment